It's summer - so of course I want to bake pies. Yes, I want to make time-intensive recipes that involve running the oven for about an hour, during the hottest part of the year. I'm not sure why I'm drawn to baking when it's 105F out, but I am.
I had some great peaches a few weeks ago, so I decided that I wanted to make a peach pie. Specifically, I decided I would try out the recipe for the Peach-Raspberry Pie that I had read about so recently.
Clearly, pie-making is an activity for a weekend, since you make a crust, prepare filling, bake it for about an hour - and should let the pie rest for at least 90 minutes before cutting into it. If I make a pie, I don't want to wait until the next day to eat it!
This pie wasn't difficult to make at all - no more difficult than any other pie, I should say. This was one of those instances where I more or less followed the recipe exactly. This is definitely one of the prettiest pies I've ever made. It's probably also the best I've ever had a fruit pie turn out.

I've made pie crusts before but this one was a little different in that it took two kinds of flour, butter, sour cream, and oil. You're supposed to use whole wheat pastry flour and regular flour, so I used regular whole wheat flour and cake flour instead.
While the dough chilled, I made the filling. I did something new with this filling - I actually blanched the peaches to get the skins off. I dipped peaches into boiling water for 1 minute; I let them cool briefly, and easily peeled the skin off. It worked amazingly well!
The dough was easy to roll out, and even when it tore, I was able to piece it together pretty easily. I draped the dough over my rolling pin and used it to transfer the dough to the pie pan.
I baked the pie in a 375F oven for about 50 minutes in my glass pie dish. I made sure to have a baking sheet on the rack underneath the pie to catch any drips. The edge of the crust browned excessively, so toward the end I put a cover over the edges to stop the browning. I let the pie cool an hour and a half after removing it from the oven before cutting into it. The pie was still runny when I cut it, but not excessively so. Pie was still warm when I cut it.

This was a delicious pie. The pie was sweet but not too sweet. The raspberries added a nice tartness to the pie. The crust was good – tender and a little flaky. It wasn’t too hard or crisp. Although the crust was half whole wheat, it didn't taste heavy or overly healthy like some crusts do. The filling ran after I cut the pie, but it didn’t make the crust soggy over the several days we took to eat the pie. (Alex wants me to point out that the dried filling was just like Fruit Rollups, if you're excited about that kind of thing.) I left the pie out on the counter, uncovered, the entire time while we worked on it - not a model of food safety, but I honestly don't know how to store fruit pies so that they won't get soggy.
I really enjoyed this pie and I'd try making it again. The filling was good and would be good with any crust recipe you used. The crust recipe itself was pretty solid. This is a great recipe and it's definitely worth trying.
📖 Recipe

- 1 ¼ cups whole-wheat flour
- 1 ¼ cups cake flour
- 2 tablespoons sugar
- ½ teaspoon salt
- 4 tablespoons cold butter
- ¼ cup sour cream
- 3 tablespoons canola oil
- 4 tablespoons water (supposed to be ice water, but I forgot and used cold water and it worked fine)
- 6 cups peeled peaches (6 large, ripe but firm peaches), sliced
- 1 cup raspberries
- ⅔ cup sugar
- 1 tablespoon lemon juice
- 3 tablespoons cornstarch
-
I mixed together flours, sugar, and salt, and cut in cold butter with pastry cutter (affiliate link). I stirred in sour cream and oil, and then mixed in water with fork until dough came together. After briefly kneading the dough until it mostly held together, I divided dough into 2 portions and flattened them into disks, wrapped them in plastic wrap, and refrigerated them 1 hour.
-
While the dough chilled, I made the filling. I did something new with this filling - I actually blanched the peaches to get the skins off. I dipped peaches into boiling water for 1 minute; I let them cool briefly, and easily peeled the skin off. It worked amazingly well!
-
I combined the peaches, raspberries, sugar, and lemon juice in a large bowl and let it rest for 5 minutes. Then I poured the mixture into a colander over a saucepan (the same one I used to blanch peaches, actually) and let the sugary juice drain for about 30 minutes. I returned the fruit to the bowl and brought the saucepan with the juice to a boil over high heat. After reducing the juice for a few minutes, I stirred in the cornstarch. I mixed the syrup into the fruit.
-
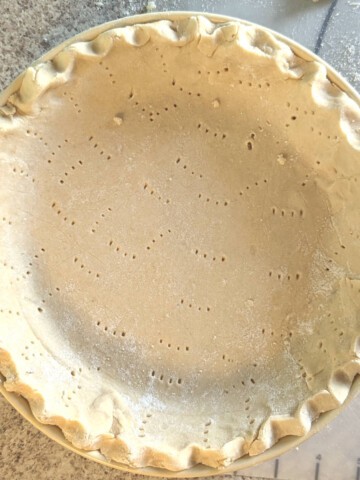
I pulled the pie crust dough out of the fridge and let it warm up for 5 minutes. I rolled out one disk between two layers of plastic wrap, until it was roughly a 12 inch circle. The dough was easy to roll out, and even when it tore, I was able to piece it together pretty easily. I draped the dough over my rolling pin and used it to transfer the dough to the pie pan. I gently positioned the dough along the bottom and sides of the pan (being careful not to stretch the dough); the recipe says to let dough overhang off the pie pan by an inch, but there wasn't much dough to trim off. I poured the filling into the pan and rolled out the other crust. I positioned this one over the filling, trying to center it. I loosely tucked the edges of the dough under the overhanging dough from the bottom crust. I crimped it together with my thumb and forefinger against the edge of the pie dish. I brushed it with a little beaten egg white, and sprinkled it with sugar, and cut a few slits in the top of the pie to allow steam to escape.
-
I baked the pie in a 375F oven for about 50 minutes in my glass pie dish. I made sure to have a baking sheet on the rack underneath the pie to catch any drips. The edge of the crust browned excessively, so toward the end I put a cover over the edges to stop the browning. I let the pie cool an hour and a half after removing it from the oven before cutting into it. The pie was still runny when I cut it, but not excessively so. Pie was still warm when I cut it.
mydearbakes says
You are so a talented baker! This is so amazing! =)
Leona says
Thank you!