
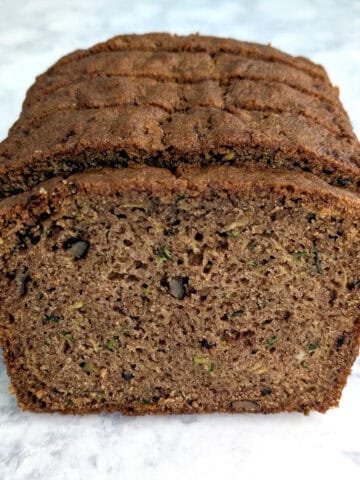
This Yeasted Banana Sandwich Bread is the bread that I make most often. Slices are tender and soft. The bread is lightly sweet, with a slight fruity undertone to it, but you'd never guess there's a banana in it!

This loaf of bread rises beautifully. The bread smells fruity as it bakes, but not overwhelmingly so. Slices are perfect as toast with jam, turned into ham sandwiches, or with peanut butter and jelly. It also makes for delightful French toast.
I've made this recipe countless times since I first tried it in November 2011; it was actually the first sandwich bread I ever made. I reprised it again 2014 for Bread 39 of my 50 Weeks of Bread challenge, so it was the first loaf of bread I made after we moved to New Jersey.
This was an unusual way to use up just one or two overripe that keep ripening before we eat them - and it is still, in my opinion, the best way.
If you've got additional overripe bananas, you can check out my Classic Banana Bread with Oats.
Jump to:
Why put a banana in sandwich bread?
Bananas are full of starch, especially as they ripen. That starch holds on to moisture in the finished loaf of bread. The sugar in the banana also sweetens the bread, and you get a faint but not overwhelming fruity taste in the bread. Even my friends who don't like bananas still like this bread. (That said, it's not for those with a banana allergy!)
Adding starch to bread to enhance its moisture content and texture isn't unusual. I've definitely seen potato rolls on grocery store shelves. And potato flakes are sometimes listed as an addition to bread dough, for that very reason.
As a more practical factor, this recipe only takes 1 banana, while sweet banana breads like my Classic Banana Bread recipe take 3. If you only have one overripe banana, this yeasted banana sandwich bread is the way to go!
Ingredients and substitutions
Banana sandwich bread just takes 7 ingredients!

- Flour
- Yeast
- Salt
- Milk
- Honey
- Vegetable oil or butter
- Banana
This recipe takes all-purpose flour instead of bread flour. Bread flour is great for developing gluten and chew, but that's not as important for sandwich bread, which you want to be more tender. That said, you can use bread flour if you want.
When I make this, I almost always make it with 2 cups of all-purpose flour and 1 cup of whole wheat flour. This changes the texture of the dough slightly when you are kneading it, but we don't notice it in the final loaf. It just adds a slight bit more fiber to the bread.
I use instant dry yeast simply because that's what I find in 1-pound packages. Active dry yeast will work fine as well.
Table salt adds flavor to the bread and also slows and controls the rising action of yeast. Don't skip adding salt to your dough. That said, since it does slow the growth of yeast - salt is a preservative! - I put my yeast and salt on opposite sides of the bowl when I add them.
Milk adds a little sugar and fat, which helps make the bread tender. We use 1% milk in my house, and it works fine in this recipe. I've had luck with using soy milk in baking in the past, and believe it would work interchangeably here as well.
Honey adds sweetness and moisture, as well as floral notes to compliment the banana. Agave syrup has a similar texture, and should also work. The same amount of brown sugar or maple syrup should work if you don't have honey, but you may have to adjust the amount of flour in the dough.
Although King Arthur Baking originally called for unsalted butter, I typically use vegetable oil for convenience. Butter will add subtle flavor. I expect coconut oil would also work well and add a nice flavor.
You can use a ripe or overripe peeled banana; both work fine. A frozen-then-thawed banana also works great for this recipe.
A large banana without peel is around 120 grams, and a small banana is around 75 grams. Add an extra splash of milk with the small banana when you mix the dough. You can add a little extra flour during the kneading process for a large banana, if the dough needs it.
Using frozen bananas
I often freeze overripe bananas to use in baking later on. To do this, just peel the banana, put it in a freezer bag, and stick it in the freezer. If you're freezing multiple bananas at once, try to keep them from touching each other; otherwise, they'll freeze together and it'll be hard to use one at a time.
PS: Definitely don't freeze bananas in their peels. It's a huge pain to get those frozen peels off!
To use a frozen banana to make sandwich bread, just remove it from the freezer about an hour in advance. It'll likely still be cold after that hour, but you should be able to mix it into the dough; be sure to mash it if mixing the dough by hand. If you're concerned it's still too frozen, microwave it for a few seconds to finish thawing it. The banana will release liquid as it thaws; just mix this into the dough.
Instructions
Time to make some bread!
I make my bread dough with a stand mixer, for ease, but you can also mix it with a sturdy wooden spoon and knead it by hand. It will just take longer.
Make the dough
Cut up or mash the banana if you're going to mix your dough by hand.
Combine all ingredients, and mix it all together so that it forms a ball of dough.
Since banana sizes vary, you'll likely need to make some adjustments with milk or flour. If there's dry bits that you can't mix in, add a splash of milk. It's much easier to add liquid now, before you knead it. It's easy enough to add a tablespoon of flour while you knead the dough.

- Knead on medium speed for around 5 minutes, until the dough is smooth and tacky. The dough will clear the sides of the bowl, but will still stick to the bottom.
Tacky is like a Post-It note; when you touch the dough, it sticks to your finger but doesn't leave residue behind. Sticky leaves behind a lot of residue.
If you've added whole wheat flour, then your dough may not be completely smooth because it'll have flecks of wheat bran in it. That's ok.
Texture can change as you knead the dough. If your dough is too stiff, add a splash of milk; add a tablespoon of flour if your dough is too sticky. Mix for another minute and check the texture again. Err on the side of too soft dough instead of too stiff.

- Place the dough in a greased bowl (or leave it in your stand mixer bowl, as I do). Cover and let rise in a warm place for about 60 minutes...

- ...until it's roughly doubled in size. If it hasn't doubled, let it rise longer.
I often, especially in the winter, create a warm space by preheating my oven for 1-2 minutes, then storing the dough in there after I turn off the heat. Don't overheat it, though; according to Bob's Red Mill, yeast begins to die at around 120F.
Shape, proof, and bake

- Turn the dough out onto a floured surface. Pat it into a rectangle...

- ...fold ⅓ of it into the center, and tuck the seam into the dough.

- Fold the other ⅓ over what you've already folded, stretching it over, and tucking the bottom of it into the loaf.

- If your dough doesn't look tense on the top, use your hands to keep tucking the dough under so that the surface tightens up a bit.
If your dough seems way too relaxed, it's ok to repeat this whole folding process again. I've definitely had to play with loaves, folding them again, to get that structural tension in the top of the dough. It's a necessary step to help the dough rise nicely!
If your dough still seems too slack, try tucking the long ends underneath the dough before you place it in the pan.

- Place the dough, seam side down, in a greased 8 x 4.5-inch loaf pan. A 9x5 inch pan works too, but your loaf won't be as tall. Spray the top with oil, cover with plastic wrap, and let rise for about 60 minutes...

- ...until the dough has risen about 1 inch over the top of the pan. (This can be more like ½ to ¾ inch for a 9x5 inch pan.)
When the bread's about done rising, preheat your oven. PS: if you're using the oven as a proving drawer, be sure to take the dough out before you turn the oven on!

- Remove the plastic wrap and bake the bread for 35-40 minutes; it's the same for an 8 inch and 9 inch loaf pan. The bread will be golden on top and sound hollow if you remove it from the pan and tap it on the bottom, which is what I usually do.
Let the loaf cool in the pan for 10 minutes, then turn it out to a wire rack to cool completely. The wire rack allows the bread to release steam which would otherwise make the bread a little soggy.
Cool completely before cutting.
Hint: If you have to neglect your dough during one of the rises - like, if errands come up - neglect your dough during the first rise. A dough that rises too much during the first rise will usually proof okay during the second rise, although it may rise too quickly in the loaf pan. If you let the bread rise too much after it's shaped, however, it may lose structure as it bakes.
Veganize it
This sandwich bread is already egg-free, which makes it very friendly if you have an egg allergy in the family.
To veganize it, try substituting:
- Soy or other non-dairy milk for the milk. Try to use something that has a similar composition to dairy milk, with both fat and sugar. I do not recommend water.
- Agave syrup, brown sugar, or maple syrup for the honey, as some vegans still avoid honey since it's made by insects.
I've definitely substituted brown sugar, and expect that non-dairy milk will work since it works well in other baking.
Equipment
I usually use my Kitchenaid stand mixer (affiliate link) when I make bread, but you can certainly make bread without it! Use a big, sturdy mixing spoon to stir the dough together, and knead by hand on a clean, floured surface. Your kneading time will take longer, around 8-10 minutes. Be sure to get the texture of the dough soft to start; kneading on a floured surface will work in additional flour.
I always use a digital kitchen scale (affiliate link) when I bake bread. Although I've included measurements by volume, a scale is the most accurate way to measure flour in particular, as the weight of a cup of flour can vary with dry or humid weather. The size of the banana will also affect how much moisture is in the dough, and knowing its weight will help you get off to the most accurate start possible.
You can use an 8.5x4.5-inch baking pan, or a 9x5 inch loaf pan (affiliate link). A 9 inch pan will give a wider, slightly less tall loaf. A shiny pan will give you a better result than a dark or glass pan will. If your pan is dark metal, I recommend lining it with parchment as I feel it slightly prevents overbrowning of the edges. Check your bread for doneness a few minutes early for a dark or glass pan.
A serrated bread knife (affiliate link) is the best tool to cut bread. I use it to cut cakes into layers, like for my Almond Cake recipe as well. The serrated edges cut through bread without squishing, crushing, or tearing it.
Completely optional is a bread box (affiliate link), but I do like using one because I can stack other containers on top of it. 😆
Serving
I usually cut slices of bread as we need them. They're great for PB&J, and I love to toast them to serve with jam or mango butter, if you live near a Trader Joe's at the right time of year. It's not out of place for a simple ham sandwich, either.
My absolute favorite way to eat it, though, is to slice the loaf into thick slices and turn them into French toast. The bread provides all the flavor, so you don't have to add sugar or vanilla to your batter. The bread compliments fruity toppings perfectly.

Storage
Store the bread at room temperature in a bread box for 4-7 days, depending on the weather. Eat the bread more quickly in humid weather, as bread is prone to mold when it's warm and humid. The bread will dry out slightly and be more suitable for toast than sandwiches toward Day 7.
If you don't have a bread box, store the bread in the loaf pan, and seal the top tightly with aluminum foil. I find plastic wrap to seal in too much moisture on the surface of the bread, and I think it imparts an off, stale taste.
Rather than cut my bread in advance, I prefer to leave it uncut and slice it as I use it, because it stays fresher that way.
Freezing
Sometimes I will freeze a half or whole loaf of bread if we can't eat it all quickly enough.
Place your half or whole loaf on a large layer of aluminum foil. Wrap tightly, covering the entire surface. Wrap a second time with a layer of plastic wrap to seal out air, then place in a large freezer bag.
When thawing, unwrap the bread to prevent condensation on the surface. Thaw at room temperature, and let thaw before slicing.
Top Tip
If you're concerned you can't get the texture of the dough perfect, go for slightly sticky instead of slightly dry. The sticky dough will give the baked bread a softer texture than stiff, dry dough will. That said, I've never had trouble baking slightly wet or slightly dry dough; the bread turns out delicious regardless!
FAQ
First, smell your dough to see if it smells yeasty. If it does, your yeast may just need more time and heat to fully activate and rise.
If the yeast is old and you're concerned, add the yeast and a pinch of sugar to milk heated to 105F. (If your milk is hotter than that, it can kill your yeast, so be careful.) Stir it well to dissolve it, and let it rest 5-10 minutes before adding it to the dough. It should become foamy and smell yeasty. If it doesn't, you should find a new package of yeast.
I usually pour my salt and my yeast in opposite sides of the bowl, including when I make this sandwich bread, because salt can slow the rising action of yeast.
If you've preheated the oven too much to proof your dough, it's possible it got too hot; yeast begins to die at 120F.
First, remember that instant yeast rises more quickly than active dry yeast. Active dry yeast may just need more time.
If your dough hasn't risen, check to see if the dough smells yeasty. If it does, the yeast may just be sluggish. Cover the dough back up and put back in a warm area to rise. I usually proof my dough in a 80F oven; I would rewarm the oven and return the dough to rise again, checking after 30 minutes to see if it's working.
You can also try kneading the dough for a few more minutes by hand to transfer some of your warmth to the dough and stimulate the yeast.
After you've shaped the sandwich loaf, I'd just add more heat and time to the rise.
It's better to have bread dough rise too much during its first rise than during its second rise, after it's already been shaped.
If your dough rises too much during the first rise, just deflate it and proceed with the recipe as usual. After you've shaped the loaf and put it in the loaf pan, the bread may rise more quickly, so check on it sooner than you would otherwise.
If my dough rises too much after I've shaped it, I'll still bake it. However, it may lose structure (and balloon outward) or collapse, depending on how long it overproved.
Other banana recipes
More things to do with those leftover bananas:

Interested in other recipes? I save and share recipes I like or want to try on my Pinterest page - follow me there! You can also check out my Facebook page for more recipes and helpful tips. I'm also happy to try to help troubleshoot my recipes there.
Have you tried this recipe? Or have a question about it? Rate it or leave a comment below! (PS: rating my recipes helps other people find them, too!)
📖 Recipe

Yeasted Banana Sandwich Bread
Ingredients
- 3 cups all-purpose flour (360 grams; use up to 1 cup of whole wheat flour)
- 2 ¼ teaspoons yeast (10 grams; active dry and instant are both fine)
- 1 teaspoon table salt (8 grams)
- ¾ cup milk (175 grams)
- 2 tablespoons honey (42 grams)
- 2 tablespoons vegetable oil (28 grams) (use butter instead for flavor, if desired)
- 1 banana (peeled) (100-120 grams) (see note)
Instructions
- Combine all ingredients in the bowl of your stand mixer to form a soft dough. Add a little extra milk if there are dry bits at the bottom. Then knead on medium with the dough hook for 5 minutes, until the dough is smooth and tacky. The dough will clear the sides of the bowl, but not the bottom.
- If mixing by hand, combine dry ingredients. Mash your banana and combine with the milk, honey, and oil. Stir liquid ingredients into dry ingredients until a dough forms, then knead (preferably in the bowl) for about 8-10 minutes, until dough is smooth and tacky.
- To test for tackiness, touch the dough with your finger. If dough clings but releases relatively cleanly, the dough is tacky. If it doesn't cling at all, add a little water or milk; if a lot of dough sticks, add a little flour. Knead briefly and test again. If you add some whole wheat flour, your dough will not be smooth.
- Place dough in an oiled bowl, cover, and proof in a warm place for 60 minutes, until dough has doubled in size. I usually preheat my oven for 1-2 minutes to create a warm space.
Folding, Proofing, and Baking
- Turn out dough onto a floured or oiled surface and pat into a rectangle. Fold ⅓ of the dough to the center, like you would fold a letter. Fold the remaining ⅓ over, stretching it to cover the rest of the dough. Pinch the dough down into the bottom of the loaf to increase the surface tension. Repeat if necessary if the dough is too slack.
- Place seam-side down in a greased 8.5-x-4.5-inch loaf pan (although 9x5 is ok too). Spray with cooking spray, cover with plastic wrap, and let rise for another 60 minutes, until the dough has risen about an inch above the top of the loaf pan.
- Bake at 350F for 35-40 minutes. The temperature of the bread will be 190F if you take its temperature, and it will sound hollow if you tap on the bottom of the loaf.
- Remove from loaf pan after about 10 minutes, and cool completely on a wire rack before slicing. I can usually get 16 slices per loaf.
Notes
Nutrition
[Originally written November 7, 2011, and December 16, 2014. Recipe revised, pictures and text updated July 25, 2020, and then May 6, 2025.]


Vanessa Perry says
Have you ever made this in a bread machine?
Leona Konkel says
I don't have a bread machine (the one kitchen item I don't have) so I have not. However, I know it works because Jenn makes it in her bread machine all the time.
Jenn says
I had some brown bananas so I decided to give this recipe a try. My son doesn't like bananas but he still loved this bread. It was slightly sweet, but not banana-y. Delicious!
Leona Konkel says
I'm so glad that you tried this bread! It's my absolute favorite on this website. It's fantastic for French toast if you ever have any left over.