
I've made countless cookies and sweets, both on and off of this website, but one of my absolute favorites is this old-school recipe for 5-ingredient Cookie Bars.
I've made these cookie bars for at least 30 years, since I was a teenager. They're incredibly simple to make - just layer sweetened condensed milk and chocolate chips over a graham cracker crust, and bake! They're rich and toothachingly sweet - not something I usually go for - and are always a crowd-pleaser.

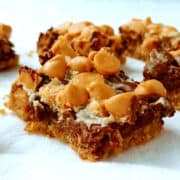
I love that they're made with all pantry ingredients so I can make them whenever the mood strikes me. They're also easy to customize. I prefer them with butterscotch chips, but my husband prefers peanut butter. For this blog post, I've made them with vanilla baking chips!
If you like these rich cookie bars with all these chocolate chips, you'll also enjoy my Chocolate Chip Cookie Bars, Chocolate Chip Cookie Cheesecake Bars, and my Chocolate Chip Cookie Scones - which actually taste like cookies for breakfast. For other old-fashioned party favorites, check out Earthquake Cake from Scratch.
Jump to:
Cookie Bars and Magic Cookie Bars
I remember the first time I had these cookie bars. My aunt made them for us when we visited, from a recipe from a coworker of hers who brought them to a potluck. The recipe was written on an index card - this was the 90s in Arkansas, after all.
They were so sweet and rich, practically all sugar. Of course, they're a kid's dream. I got the recipe from her, to make over and over again. I have no idea if my mom or sister ever make them, but I probably bake them often enough for the three of us.
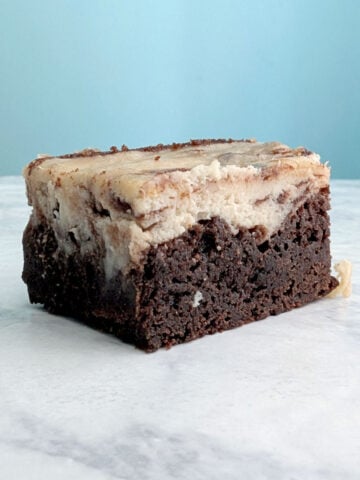
I have a feeling that these cookie bars were actually a variant of magic cookie bars - you know, the ones where you layer coconut and nuts and chocolate chips on a graham cracker crust topped with sweetened condensed milk. That can't be as tasty as mine, though. Who needs coconut or nuts, when you can have all chocolate or candy?
Ingredients
I think this is the only recipe that I make solely from prepackaged ingredients, but it's worth it!
As I said, these take just 5 ingredients, and they're all pantry ingredients!

Graham cracker crumbs form the base. A box of crumbs will be enough. I bet you could also crush and use plain (not iced) or chocolate animal crackers if you'd rather. You can use up the rest the box of crumbs you bought by making a Homemade Graham Cracker Crust!
Melted butter holds the graham cracker crumbs together. Use margarine if you prefer, like I did in the 90s.
Sweetened condensed milk helps bind the crust to the chocolate chips, and is just so incredibly delicious. It's thick and has sugar added, and a can will keep for a little while in your pantry. There's no substitute for this. It is not the same as evaporated milk, which is thinner and unsweetened. I expect that you could use fat-free sweetened condensed milk, but I haven't tried it.
I use semisweet or dark chocolate chips as one of my chocolate chip layers. You can use milk chocolate chips instead. No need for anything pricey - I usually use store-brand chips here.
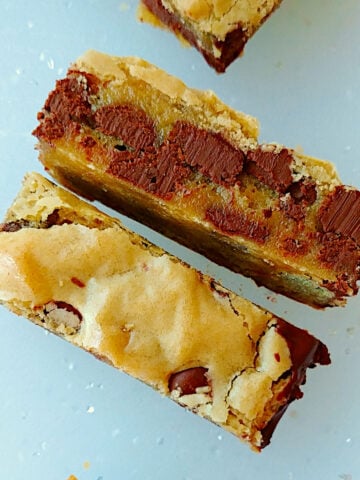
Last is a pretty layer of butterscotch, vanilla, or peanut butter chips. You can substitute milk chocolate instead to contrast with dark chocolate, or try mint chips, which are seasonal. I remember finding raspberry flavored chips when I was a teenager; those were amazing in cookie bars. In any case, use whatever you've got. Sometimes I use a mix of flavored chips when I've got opened, partial bags.
Instructions
You're only going to take 10-15 minutes getting these in the oven - and part of the work happens in the oven as it preheats!

- Place a stick of butter in a 9x13 inch pan, and put the pan in the oven while it preheats to melt the butter. Check on it after about 5 minutes; you don't want the butter to pop and spatter.

- Remove the pan from the oven, and spray the sides with cooking spray. Use a fork to mix the crumbs into the butter, and once they're all moistened, spread the crumbs back out. Pat them down gently with the fork.
Be sure that your graham cracker crumbs are finely crushed (if you're crushing them yourself), and that all the crumbs are moistened. Dry crumbs won't stick to the layers above, which means your crust will fall off. (Ask me how I know! 🤣)

- Drizzle the sweetened condensed milk over the crust. Don't pour it all into one spot, as you don't want to disrupt the crust by spreading out the milk. Try to get the milk almost up to the sides.
(I have a few globs in this photo, of milk I scraped from the bottom of the can. This is normal behavior for sweetened condensed milk, and the globs bake up fine.)

- Layer on the bags of chocolate chips and flavored chocolate chips. I'm using vanilla baking chips in this photo.

- Bake for 25-30 minutes, until the chocolate is melty and the sides turn a light golden brown. Don't overbake, or the bars will be harder to cut and eat.

- Cool the cookie bars for an hour before cutting, but don't wait longer. If you cut them at 30 minutes, everything will resolidify together somewhat when they cool. If you wait longer than 60 minutes, you'll have a hard time cutting through what's cooled into a giant candy bar.
This photo is of a batch I made with butterscotch chips, back in 2018.
Hint: my pan isn't too hot when I pull it from the oven after melting the butter, but I still hold it with a pot holder. If patting ingredients into a hot baking pan worries you, you can melt the butter in the microwave or on the stove, stir in the crumbs, and pat the crust into a room temperature pan instead.
Equipment
For my 5-ingredient cookie bars, you only need 1 pan, 1 measuring cup, 1 can opener, and 0 bowls. It's hard to get much easier than that!
The pan is important, though. I have a metal 9x13-inch pan that I love, and these turn out great in it. Since you will be cutting these in the pan, do not use nonstick bakeware, as you will scratch it.
I've also made them in a glass baking dish. They are still delicious, but the edges cook a little more quickly. Try reducing the oven temperature by 25 degrees Fahrenheit if using glass. Bake time may be slightly different.
Cookie bars do stick slightly to the edges of the pan, so again, don't use nonstick bakeware. Use a pan with flat and level edges and corners, not sloped ones.

Storage
Store cookie bars in an airtight container at room temperature after they're cool. They're very shelf-stable. They're also pretty good (i.e., they don't dry out) after the container's left open at potlucks.
As with most baked goods, cookie bars are best within the first few days, but they're still tasty up to a week after you've made them.
Top Tip
Be sure to cut your cookie bars while they're slightly warm, particularly if the sweetened condensed milk browns a lot. If they cool completely, you'll have a hard time cutting through solidified chocolate. If you cut the bars while they're too hot, everything will swirl around and you'll just have to cut them again when they're cooled. They won't be very pretty, though they'll still be just as delicious!
Cookie Bar FAQs
If you don't have graham cracker crumbs available, you can crush your own from sheets of graham crackers. I also expect that you could crush vanilla wafers, plain (uniced) animal crackers, or chocolate animal crackers. Whatever your base, you'll want it to be very finely crushed, with no large chunks, which won't stick to the top layers very well.
In a pinch when I've run short, I've substituted in lightly sweetened oat or rice cereal for a small portion of the graham cracker crumbs in a graham cracker crust. You don't want your crust to be crunchy, so be sure they're finely powdered.
Sweetened condensed milk is thick and has sugar added, while evaporated milk is thinner and does not have added sugar. While both sweetened condensed milk and evaporated milk come in cans and are shelf-stable, they cannot be substituted for each other.
More recipes with sweetened condensed milk
If you love sweetened condensed milk like I do, you should try:

Have you tried this recipe? Or have a question about it? Rate it or leave a comment below! (PS: rating my recipes helps other people find them, too!)
📖 Recipe
Cookie Bars
Equipment
- 9x13 inch pan
Ingredients
- 8 tablespoons butter (113 grams; 1 stick)
- 2 cups graham cracker crumbs (250 grams)
- 14 ounces sweetened condensed milk (397 grams; 1 can)
- 12 ounces semi-sweet or milk chocolate chips (340 grams; 1 bag)
- 12 ounces flavored chips or other chocolate chips (340 grams; 1 bag) (butterscotch, peanut butter, vanilla, or whatever else you'd like)
Instructions
- Heat oven to 350F. Place butter in 9x13 inch metal or glass baking pan; do not use non-stick bakeware.
- Melt butter in the preheating oven. This only takes about 5 or so minutes. Don't overheat it, or it will pop and spatter.
- Remove pan from oven. Carefully spray the sides of the pan with cooking spray to prevent sticking. Stir the graham cracker crumbs into the melted butter; be sure all crumbs are moistened. Gently pat the crumbs evenly across the bottom of the pan.
- Drizzle sweetened condensed milk on top of the crust, getting it up to the edge. Try not to pour it all in one spot.
- Layer with both bags of chocolate chips, spreading them out evenly.
- Bake 25-30 minutes, until edges are slightly browned. You can bake until all the sweetened condensed milk is browned if you'd like, but the edges will be chewier, and it will make the pan harder to clean.
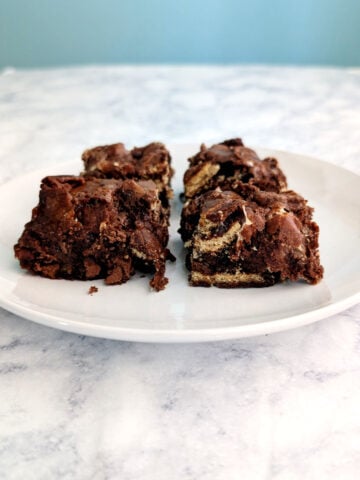
- Cool bars for 60 minutes before cutting, and cut bars while slightly warm. They'll be too hard if they cool completely. Cookie bars are rich, so I like cutting them rather thin and small.
- Try not to eat them all in one sitting. Once the cookie bars are cool, store them in an airtight container at room temperature. They'll stay good for several days, if you have any left!
Notes
Nutrition
[Originally published June 20, 2011. Updated text, photos, and recipe in September 2018; revised moderately in April 2025.]


Leona Konkel says
I've adored this recipe for 30 years, and my love for them is as bright as ever. I hope you enjoy them as much as I do!