
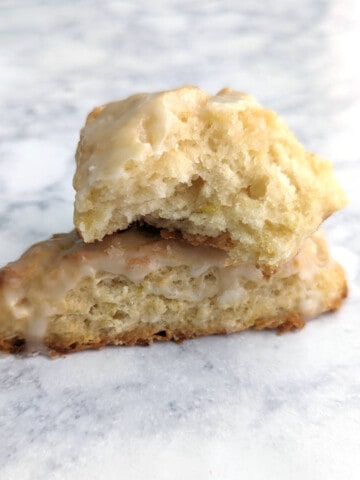
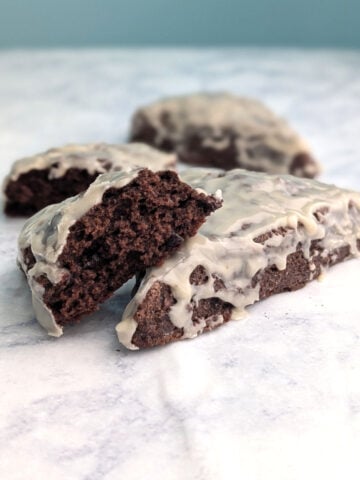
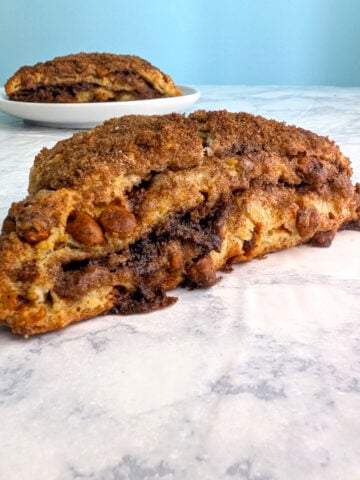
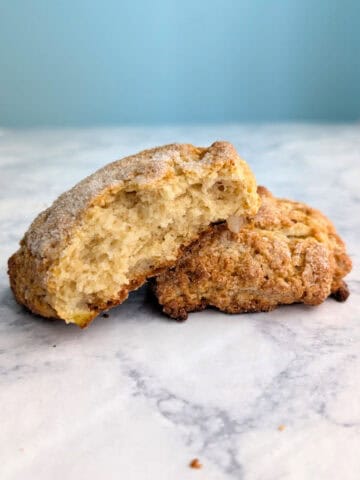
One of my favorite things to make in December and January is these Chocolate Orange Scones. They're crisp on the outside, tender inside, and super easy to make ahead. Plus, they're a great way to use up leftover Christmas candy!

My husband grew up finding one of those break-apart chocolate oranges in his stocking each year, and sometimes the rest of us do. While Alex and Amelia eat theirs right away, I save mine to tuck into these sweet winter scones.
Both milk and dark chocolate oranges are delicious in this simple vanilla dough. With one chocolate orange I usually get two batches of scones - one to bake, and one to freeze for cold winter mornings when we need a little extra cheer.
[This post contains affiliate links. I may make a commission for purchases made through links on this post. As an Amazon Associate, I earn from qualifying purchases.]
Jump to:
Why I Love These Chocolate Orange Scones
You'll love these Chocolate Orange Scones because they're:
- Crisp on the outside, tender inside
- A cozy, sweet winter breakfast treat
- Perfect for using up leftover holiday chocolate
- Easy to make ahead and stash in the freezer for a snowy morning!
Ingredients
Just like my other scone recipes, Chocolate Orange Scones take basic pantry ingredients, just with one special mix-in. You'll need:
- Flour and sugar
- Baking powder and salt
- Butter
- Milk, egg, and vanilla extract
- A chocolate orange!
Butter provides flavor; keeping it cold helps the scones rise. That said, vegan butter should work if you need to be dairy-free.
I use 1% dairy milk when I bake since that's what we use in the house. Half-and-half and cream would make the scones extra rich, but you may need a little extra to get the dough to come together. Non-dairy milk should work; I haven't tested it in this specific recipe, but I've used it successfully in other baked goods.
An egg helps keep the scones moist and tender, but skip it if you're allergic. Instead, add an extra ¼ of milk or cream, one tablespoon at a time, until the clumpy dough forms.

Clearly, the star of the scones is the chocolate orange, which adds citrus flavor to the scones without dealing with juice or zest. Both milk and dark chocolate oranges are great in the scones. Terry's Chocolate Orange is perhaps the best-known one, but Aldi and others have store brands seasonally.
Recommended Equipment
You can make scones without special equipment, but here's what will make it easier.
Use a pastry cutter to cut the butter into the flour; it's faster than using two knives (like I suggest in my Layered Cinnamon Scones), or your fingers. I prefer this pastry cutter (affiliate link) that has blades instead of basic tines.
A bench scraper helps you cut the scones neatly and evenly without sawing, as well as lift and transfer them to the baking sheet. As a bonus, my bench scraper (affiliate link) also has measurements etched into it.
I prefer to use shiny or light aluminum baking pans since they bake evenly. I always line them with silicone mat or parchment paper.
Instructions
First, break up your chocolate orange. Chop up half of the chocolate orange until pieces are no larger than chocolate chips. Use the other half for a second batch of scones, or a snack!

- Combine the flour, sugar, baking powder, and salt in a large bowl. Cut the cold butter into small cubes, then add to the flour mixture. Use a pastry cutter (affiliate link) to cut the butter into small pieces (smaller than peas). Then, stir in the chopped chocolate orange.

- Mix together the milk, egg, and vanilla, then add to the flour mixture. Use a fork to gently toss the ingredients together. Don't stir vigorously; you just want everything moistened.
I mix with a fork because dough clumps together more on a spoon. The fork makes it easier to toss the ingredients together, which is important since you want to handle the dough as little as possible.

- Once most of the flour is moistened, you should have just a few crumbs left. Gently knead the dough in the bowl 6-7 times, by folding the dough on top of itself like folding a sheet of paper. Sprinkle in crumbs from the bowl onto the dough as you go, but work gently.

- Lift your dough from the bowl onto a lightly floured surface. (The dough may be rather wet.) Pat it out into a 1-inch tall circle, about 7-8 inches in diameter. Use a knife or a bench scraper (affiliate link) to cut the dough into 8 wedges.

- Place wedges on a silicone mat or parchment-lined baking sheet, with about 1 inch space between the scones.
Optionally, chill for 15 minutes to let the dough firm up; you'll get better rise and less spreading. I did not chill the scones for this test batch.

- Bake for 18-22 minutes. Scones will be lightly golden, and a toothpick inserted into a scone (but not into chocolate) will come out clean.
The scones above were not chilled before baking.
Hint: Handle the dough gently. Rough handling will lead to tough scones.
Serving and Storage
Serve scones immediately. They're best warm, about 5-10 minutes out of the oven. I always have mine alongside tea or coffee.
Scones are best on the day they're baked, but you can store leftover scones in an airtight container. The texture won't be as good on the second day, but they'll still be tasty. Place leftover scones on a plate and microwave them for 8-10 seconds to warm them up.
Make-Ahead
Scones are a perfect breakfast treat to make ahead! You can make, shape, and cut the dough, and store them in the refrigerator overnight. Then, bake as usual the next morning.
My favorite thing to do, though, is freeze the dough! Separate the cut scones and place them on a lined baking sheet (for easy removal) about ¼ inch apart. Freeze until solid to the touch. Remove scones from the sheet and place in a plastic freezer bag. Be sure to label it with baking instructions - your future self will thank you.

Bake scones directly from the freezer, without thawing, for an extra 2-3 minutes. Scones will be a little golden at the edges, but they'll pass the toothpick test.
Tips for Making Great Scones
- Use a fork to toss the dough together.
- A little dry flour in the bowl is normal and okay. The dough should stick together when you shape it.
- If the dry flour doesn't incorporate into the dough by halfway through kneading, add another teaspoon or two of milk. It's better overall to have slightly wet dough than dry dough.
- Handle scone dough gently and avoid overmixing, which develops gluten and makes the scones tough.
- Keep butter cold for better rise and less spread when the scones bake. If you plan to freeze the dough, though, you can soften the butter a little to make it easier to mix.
FAQ
In the United States, scones are tender, fluffy pastries similar to biscuits but lightly sweetened. Baking powder or baking soda makes the scones rise as they bake. My Chocolate Orange Scones follow the classic method for making scones and include an egg in the dough for extra tenderness.
I've never had an issue with this dough being too dry, but if you have to choose, slightly wet dough is better than slightly dry dough. The bulk of the scone dough should stick together, with only a little dry flour at the bottom of the bowl - that flour should stick to the dough as you knead it. If it doesn't by halfway through kneading, add another tablespoon of milk to help it come together.
Wet dough will create nice, fluffy scones, as long as the dough isn't batter-like and runny. If the dough is wet, flour your work surface very well before you turn it out, and use floured hands so dough doesn't stick to your fingers. Dust off excess flour before you transfer scone wedges to a baking sheet; the wedges may be extra fragile when you lift them.
Yes! I often do. You can make and shape the dough, then refrigerate it overnight and bake as usual the next day. You can also freeze the shaped dough; bake from frozen (no thawing), adding 2-3 minutes to the baking time. Baked scones can be frozen too, although I find they're never as good as freshly baked scones.
Although scones are best on the day they're baked, you can save them for the next day. Store leftover scones in an airtight container at room temperature for 1-2 days. To reheat, microwave individual scones for 8-10 seconds immediately before eating; overheating will make scones tough.
All-purpose wheat flour helps provide structure these Chocolate Orange Scones need. Gluten-free flour blends all behave differently, and baked goods made with them often end up crumbly or fall apart. For best results, I recommend finding a different scone recipe specifically developed to work with gluten-free flour.
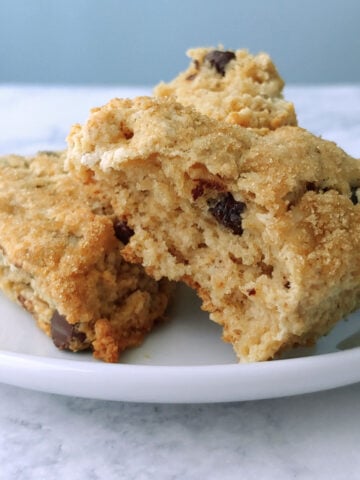
During the holidays, you can often find mint or even raspberry chocolate oranges, which will work just as well. You can use a 3-ounce bar of orange-flavored chocolate from the candy section of a grocery store; I know Aldi carries some. If you can't find flavored chocolate at all, use chocolate chips and add the zest of half an orange directly to the flour mixture. If you're not set on adding orange, I highly recommend my Chocolate Chip Cookie Scones for a tasty alternative.
Other Winter Breakfasts
Here's some of my other favorite cold-weather breakfasts.

More Make-Ahead Recipes
Here's other recipes I love to make in advance.


Interested in other recipes? I save and share recipes I like or want to try on my Pinterest page - follow me there! You can also check out my Facebook page for more recipes and helpful tips. I'm also happy to try to help troubleshoot my recipes there.
Have you tried this recipe? Or have a question about it? Rate it or leave a comment below! (PS: rating my recipes helps other people find them, too!)
📖 Recipe

Chocolate Orange Scones
Equipment
- pastry cutter (affiliate link)
- bench scraper (affiliate link)
Ingredients
- 2 ½ cups all-purpose flour (300 grams)
- ½ cup sugar (100 grams)
- 1 tablespoon baking powder
- ½ teaspoon table salt
- 8 tablespoons butter (113 grams; cold and diced)
- ½ cup chocolate orange or other orange-flavored chocolate (about 80 grams/2.75 ounces, or half of a chocolate orange; chopped)
- ⅔ cup milk (150 grams)
- 1 egg (lightly beaten)
- 1 teaspoon vanilla (5 grams)
Instructions
- In a large mixing bowl, stir together the flour, sugar, baking powder, and salt.
- Add the cold, diced butter and toss it with the flour mixture. Use a pastry cutter (affiliate link) or your fingers to cut the butter into the flour until only some pea-sized lumps remain.
- Stir in the chopped chocolate orange.
- Add milk, a lightly beaten egg, and vanilla to the flour mixture. Use a fork (not a spoon) to stir the dough, lightly pushing the flour and liquid together. You want to be gentle here. Mix until there's only a little flour left in the bottom of the bowl.
- Use your hands to gently knead the dough. I do this in the bowl, although you can use a lightly floured surface instead. Sprinkle the crumbs on top of the dough, then fold the dough in half on top of itself. Pat the dough down gently if you need to. Repeat this process 6 times.
- Lift the dough from the bowl onto a lightly floured surface. Your dough will likely be pretty wet. Pat it into a 1-inch tall circle, about 7-8 inches in diameter. Sprinkle with a little sugar if desired. Use a bench scraper (affiliate link) or knife to cut the circle into 8 scones.
- Optionally, chill the scones for 15-30 minutes to allow the dough to firm up, creating a better rise and less spreading when they bake.
- Place the scones apart on a silicone mat- or parchment-lined baking sheet. Bake at 375F for 18-22 minutes. The scones will be golden along the edges, and a toothpick inserted into the middle of one will come out clean as long as it doesn't hit chocolate.
- Serve warm or at room temperature; scones are best the day they're baked. Store leftovers in an airtight container, and reheat briefly (8-10 seconds in the microwave) when serving.
Make Ahead
- After cutting the scones, place them, separated, on a lined baking sheet. Chill the dough, and bake as normal the next morning.
- Alternatively, freeze the scones, then to a freezer bag. Label with baking instructions, and freeze for up to about a month.
- To serve, bake frozen scones at 375F for 20-24 minutes, directly from the freezer, without thawing.
Notes
Nutrition
Originally written January 12, 2022. Restructured and rewritten January 9, 2026.


Leona Konkel says
I enjoy these scones so much that I go ahead and buy myself chocolate oranges - I don't want to chance not getting one for Christmas! I hope you try this recipe and enjoy it as much as my family does. Let me know how it turns out!