
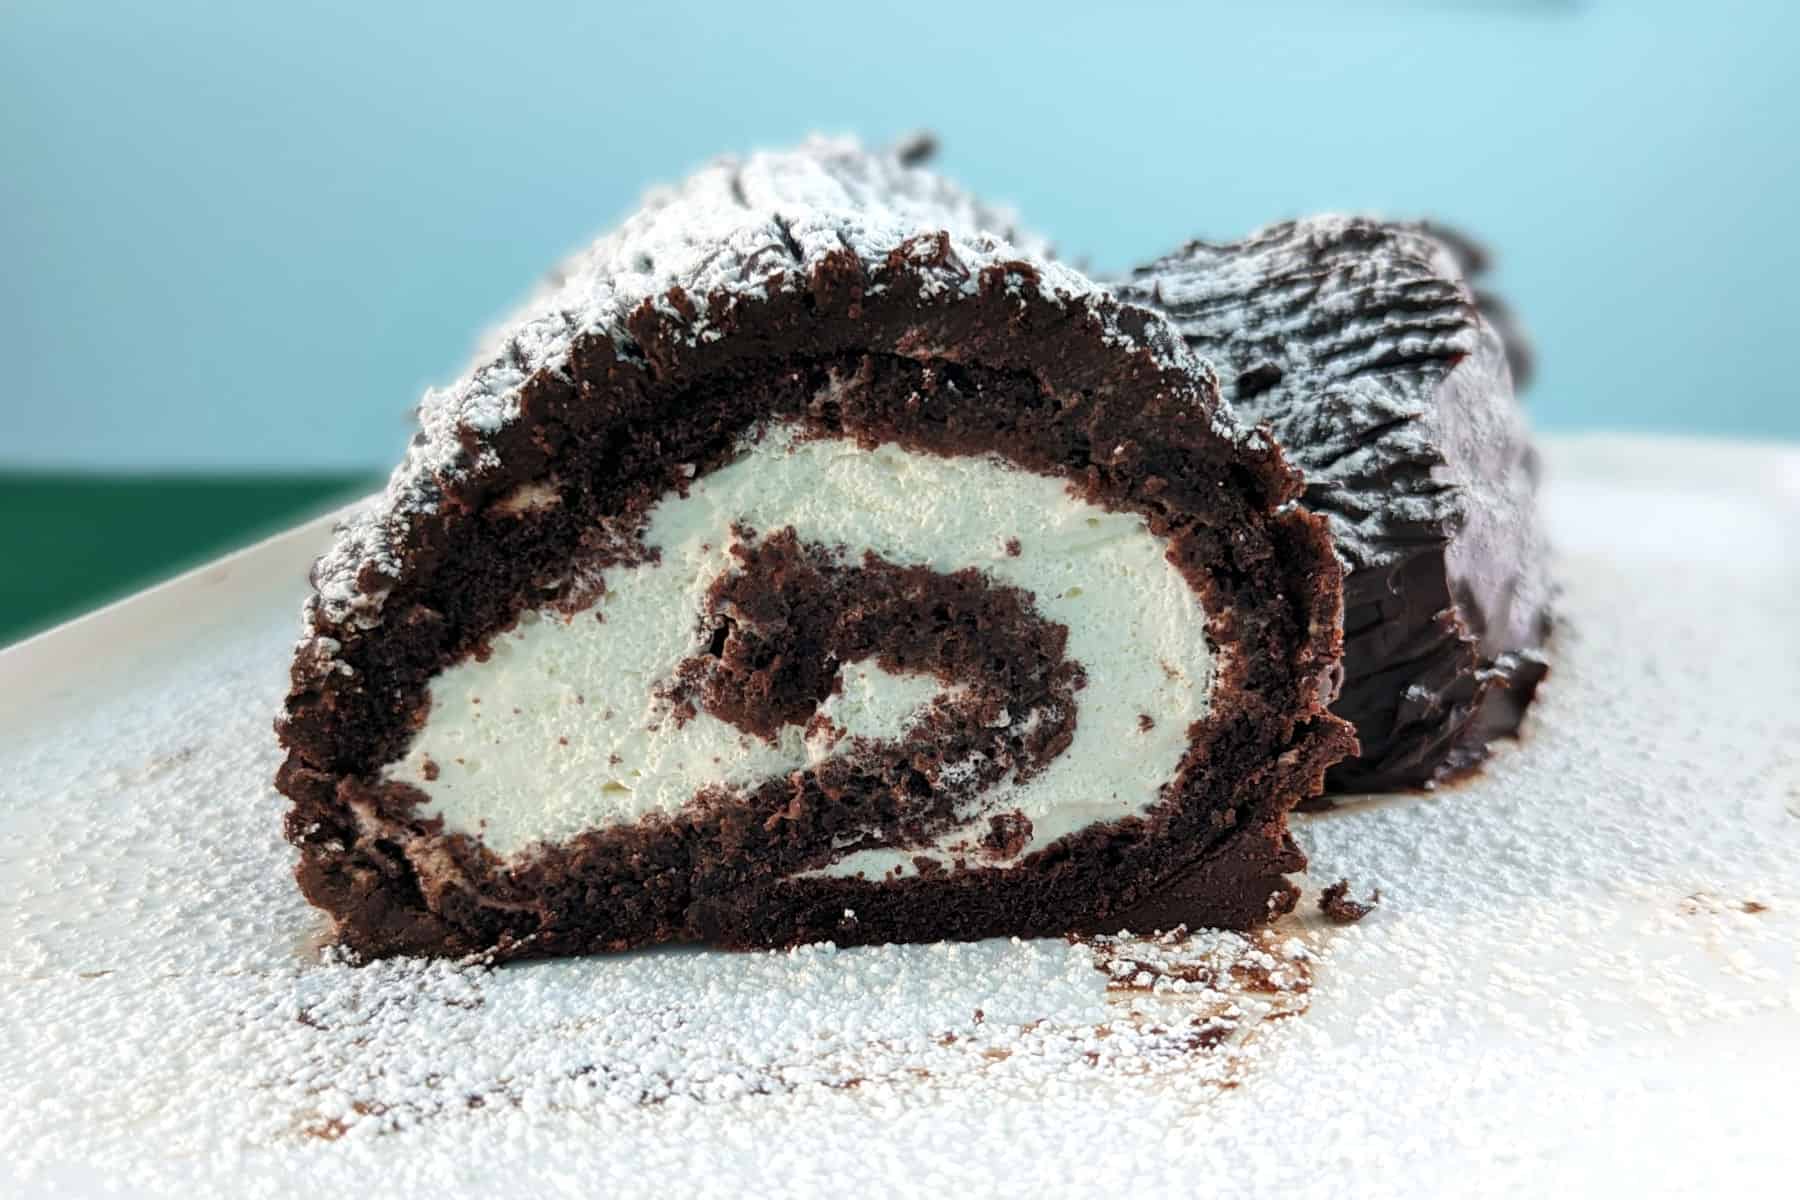
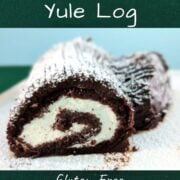
Soft chocolate cake, luscious whipped cream, and rich chocolate ganache - my Flourless Chocolate Yule Log is festive, naturally gluten-free, and easier to make than you think!
Several years ago, Alex and I watched Mary Berry from the Great British Baking Show make a yule log, and I've spent the last decade obsessed with them. They look so wintery and fun! I look forward to making at least one each December.
This gluten-free chocolate sponge rolls without cracking, whipped cream and chocolate ganache come together quickly, and I'll walk you through the whole process! And remember - even imperfect yule logs are delicious!
Why You'll Love It
This Chocolate Yule Log looks fancy, but the process is friendly. Here's why you'll love this recipe:
- The tender, soft chocolate sponge rolls easily and doesn't break.
- Lightly sweetened whipped cream balances the richness of the dessert.
- Rich chocolate ganache blankets the top in decadence.
- A dusting of powdered sugar hides imperfections and adds snowy charm.
- Naturally gluten-free, so more friends can enjoy it during the holidays.
- Step-by-step instructions and photos to guide you from start to finish.
Ingredients
One nice thing about this flourless cake is that the entire recipe takes only 8 ingredients!
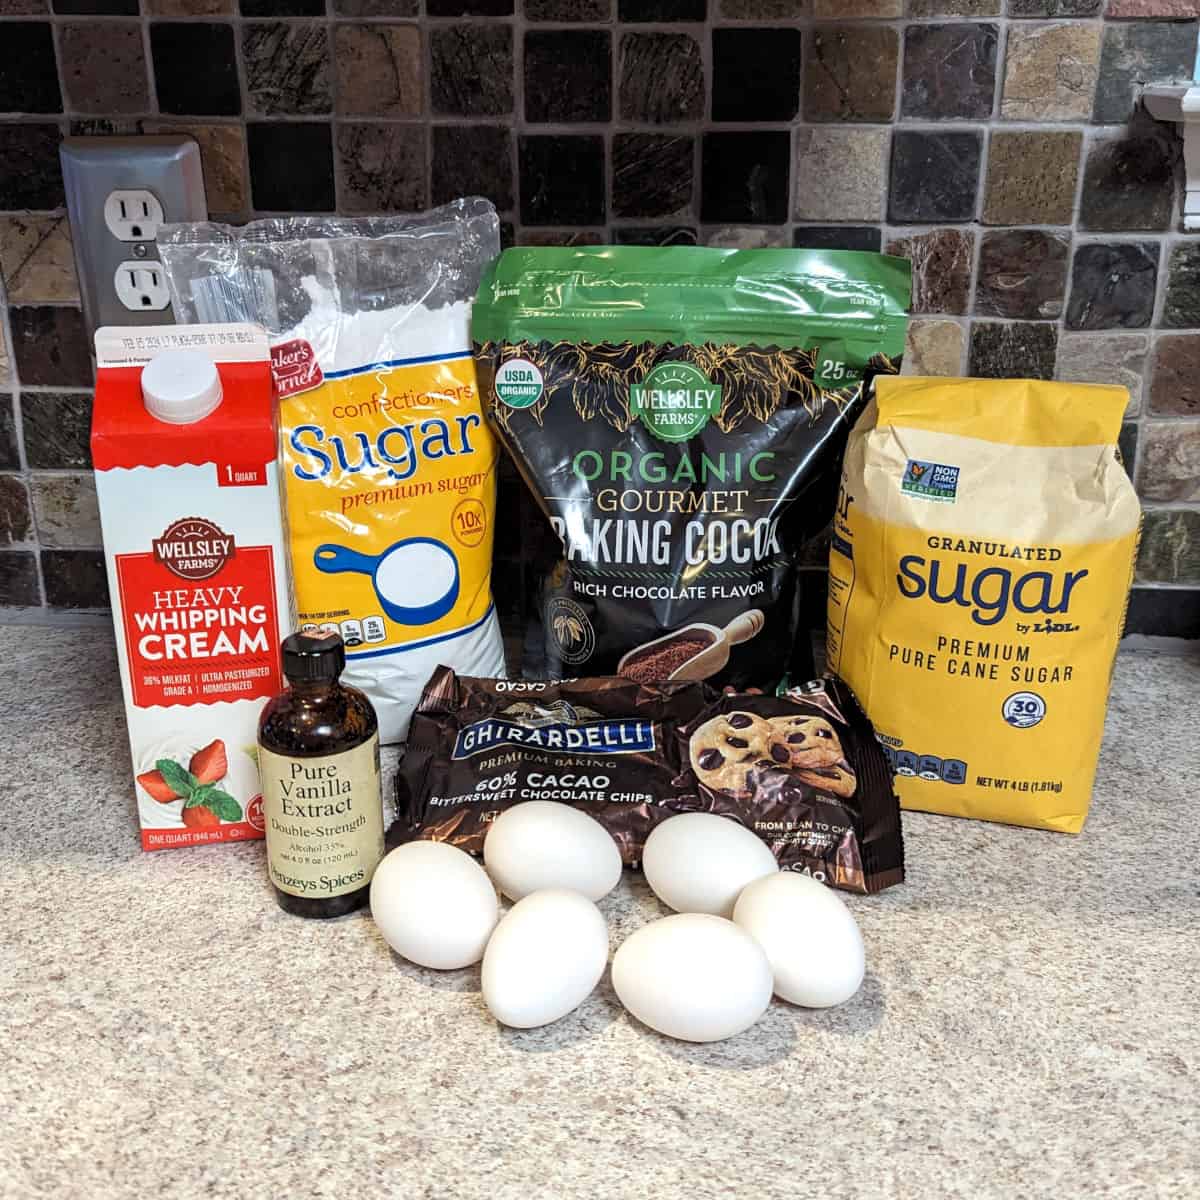
- Eggs
- Granulated sugar
- Unsweetened cocoa powder
- Vanilla extract
- Table salt
- Heavy cream
- Semisweet chocolate
- Powdered sugar
Since this is a gluten-free cake with no chemical leavening, eggs provide the cake with its lift and bind everything together. There's no substitute for eggs in this recipe.
Of course, use unsweetened cocoa powder, not the prepackaged cocoa drink mixes.
Vanilla extract and table salt round out the flavor in the cake.
You need heavy cream to make whipped cream for the filling; neither light nor whipping cream will whip as well. Don't try non-dairy whipped topping; it's too soft anyway. For a dairy-free version, see the dairy-free section.
Cream also goes into the ganache with the semisweet chocolate. Choose something you enjoy eating - nothing too dark, and nothing too light. The 60% chocolate shown here is almost too rich; use something in the 40-55% range.
A little powdered sugar goes into the whipped cream, but also importantly, you dust the yule log with the powdered sugar to give the cake a nice, wintery look of snow.
Tips Before You Start
A few quick tips to set you up for success as you make the yule log:
- Read the entire recipe and walkthrough, as timing is important for this recipe. After you do one step, look ahead to see what's next.
- Add sugar gradually to the egg whites and yolks so it dissolves smoothly and doesn't clump up.
- Slow down the mixer speed when egg whites and whipped cream are almost at the right consistency. Remember: you can always mix more, but you can't undo overmixing.
- Dry ingredients like cocoa powder and powdered sugar tend to fly everywhere. Always start mixing at low speed to reduce mess.
Equipment
You need a minimum of two large bowls to make the sponge. If you wash them, you can reuse them to make the whipped cream and ganache.
Beating egg whites to stiff peaks is hard work, so do not try to make the cake batter by hand. Use an electric mixer. I prefer a hand mixer (affiliate link) so that I can use the same beaters to mix ingredients in multiple bowls, but a stand mixer also works.
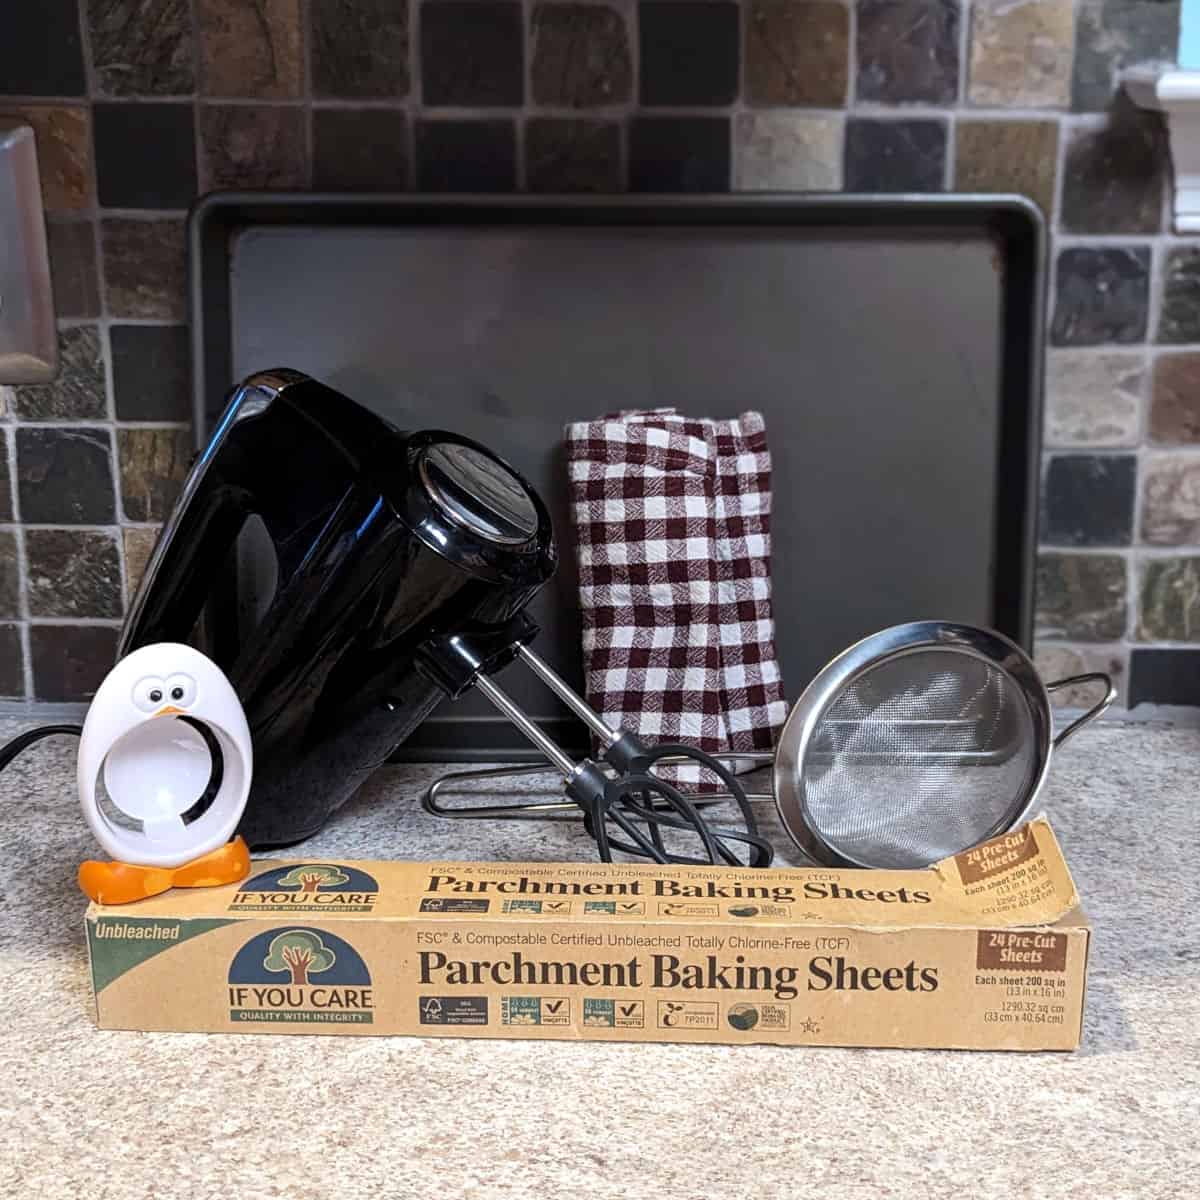
This cake is made in a jelly roll pan, which is 15x10x1 inches. The cake will expand in height, so you need the jelly roll pan (affiliate link) to have that rim. A larger pan spreads the batter too thin; it might burn. A smaller pan may work, but the cake won't roll as well. I also use the jelly roll pan for Chocolate Sheet Cake, Chocolate Oat Bars, and Saltine Toffee.
Use parchment paper to line the pan. A silicone baking mat won't fit to the sides of the jelly roll pan; waxed paper shouldn't be used in the oven. Aluminum foil works in a pinch, but may tear as you remove it. Not lining the pan risks the cake being stuck in the pan.
Although you can turn the cake onto parchment or waxed paper, a lint-free tea towel will absorb moisture as the cake cools.
Although optional, an egg separator makes it much easier to separate egg yolks and whites. I highly recommend using an egg separator (affiliate link); it doesn't take up much drawer space.
Use a sieve to dust the powdered sugar. You don't want clumpy snow on that pretty yule log!
How to Separate Eggs
I've found that using an egg separator (affiliate link) makes the process less frustrating and reduces egg breakage.
I always use three bowls to separate eggs: one to crack the egg over, one for yolks, and one for whites. That way, a broken yolk doesn't contaminate the rest of the egg whites.

Place the separator over a small glass bowl or storage container. Crack the egg into the separator; the yolk should stay in the separator's cradle, while the white drains underneath. Deposit the yolk in its bowl and the white in the other.
If your yolk breaks and mixes with the white in the separator bowl, don't worry; just store it in the fridge to use as a whole egg another time. Grab a fresh bowl for separating eggs, and carry on.
Tips for Success:
- Cold eggs separate more neatly than room temperature eggs.
- A little egg white in the yolks won't hurt, but the egg whites won't whip properly if they're contaminated with yolks.
- Always use metal and glass containers to mix and store eggs, as plastic holds on to oils and smells which affects how they whip.
- Broken eggs happen. Last time I made this yule log, I had to crack nine eggs total, because three of them didn't separate properly!
Make the Sponge
Prepare a 15x10x1-inch jelly roll pan (affiliate link) now. Line it with parchment, and then spray it with cooking spray. Don't skip this step.
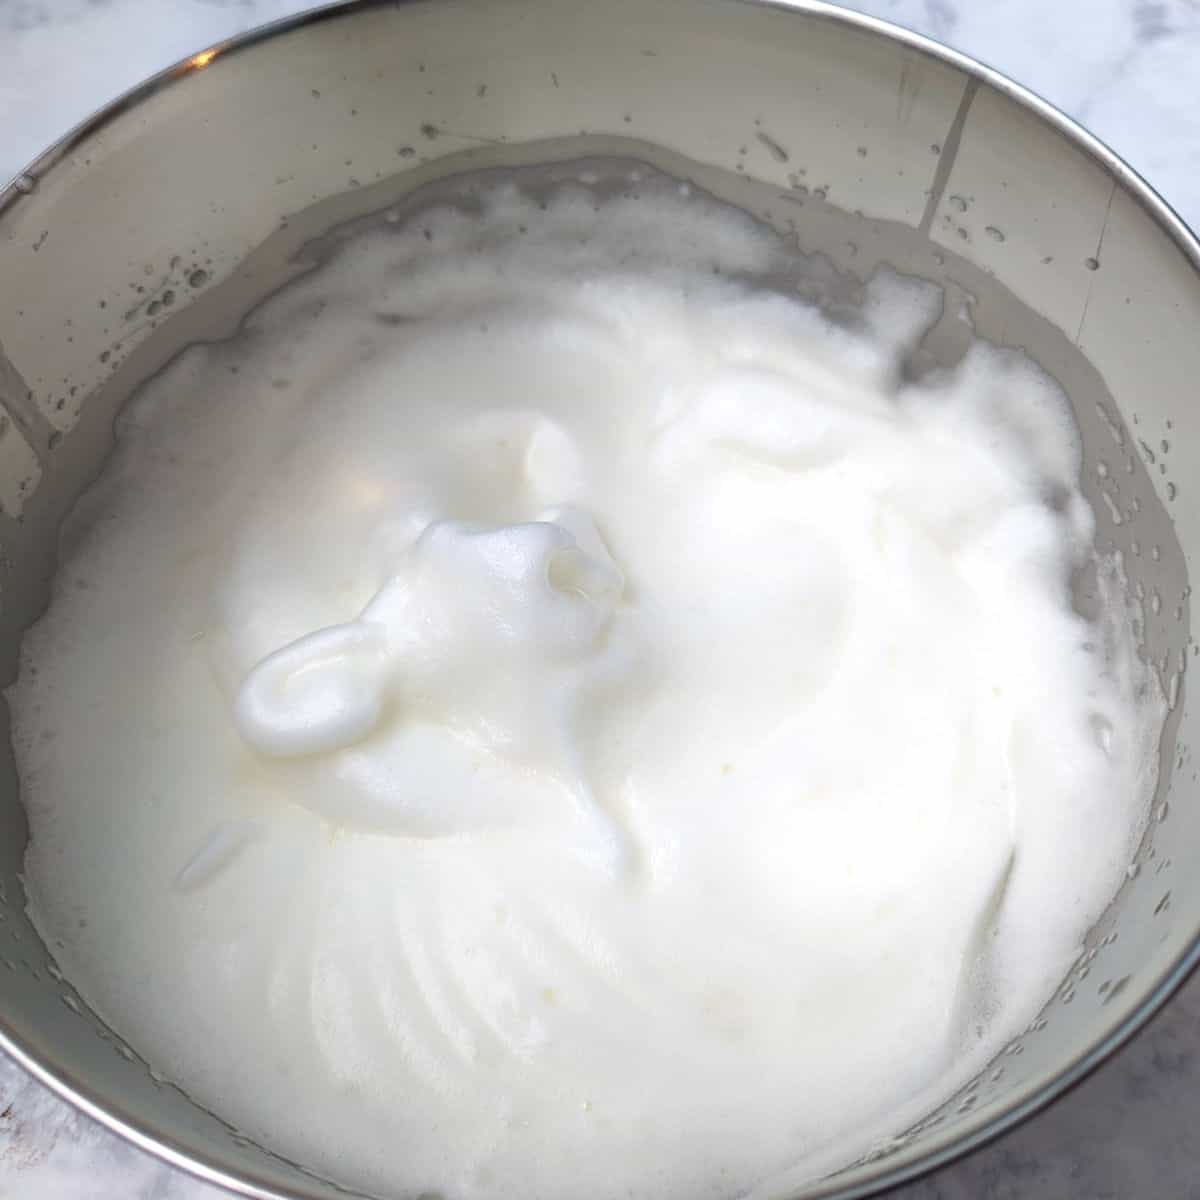
- Place the egg whites in a large mixing bowl. Beat on high speed until soft peaks form.
These clumps were soft peaks that sank back into the mixture.
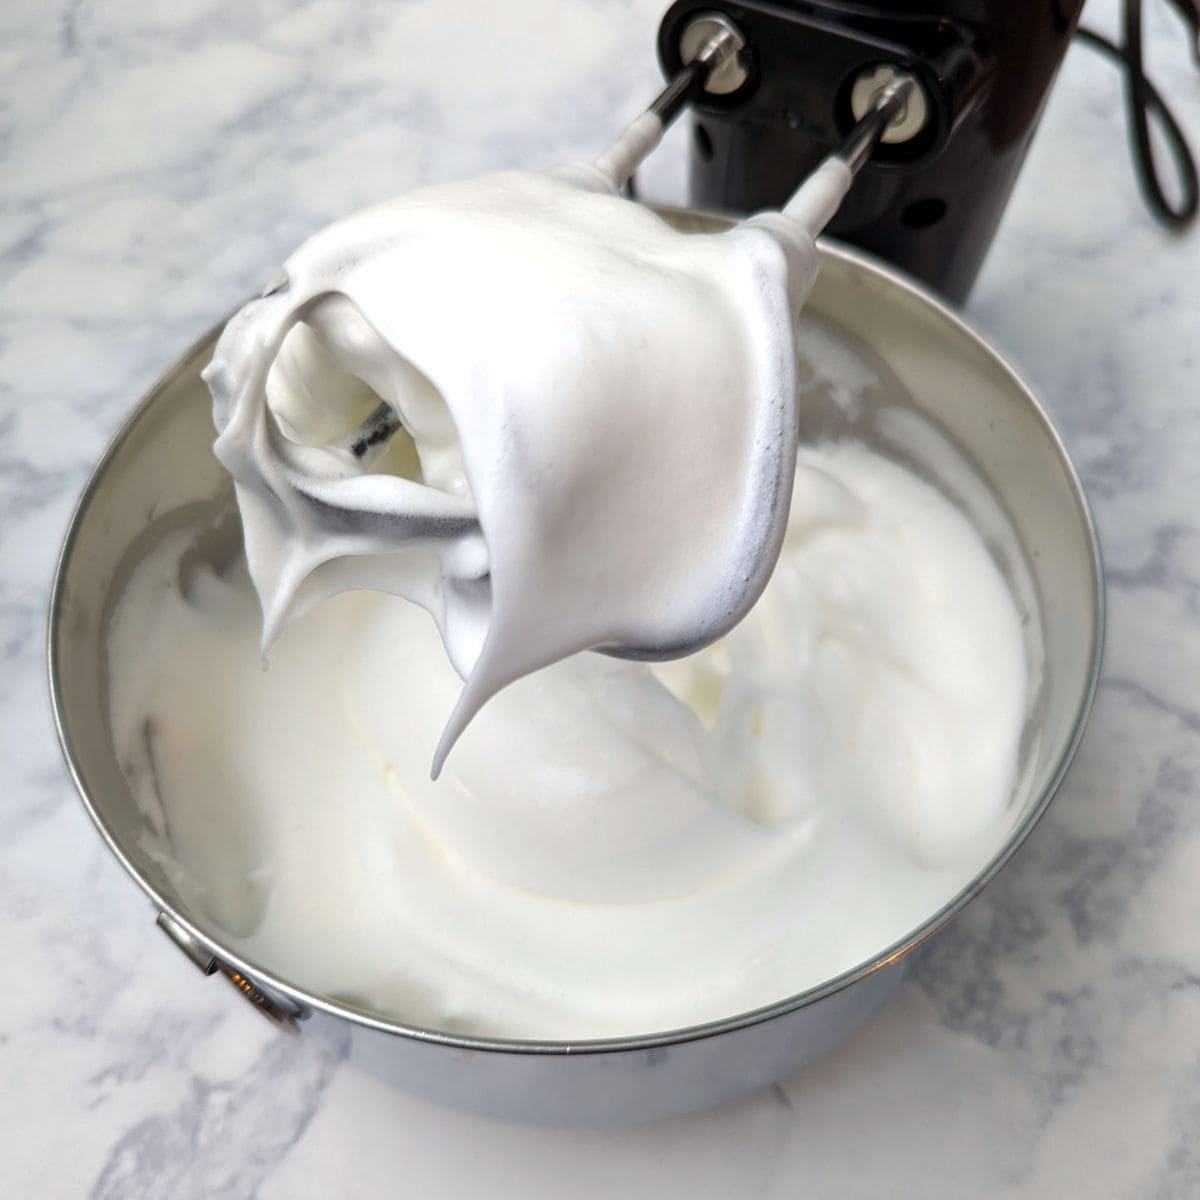
- Beat in 2 tablespoons of sugar, and then beat in another 2 tablespoons; this ensures the sugar doesn't clump. Beat on high until stiff peaks form and hold shape, and the whites are glossy. Scrape egg whites off the beaters.
Slow down the speed as the egg whites get closer to stiff, so you don't overmix them.
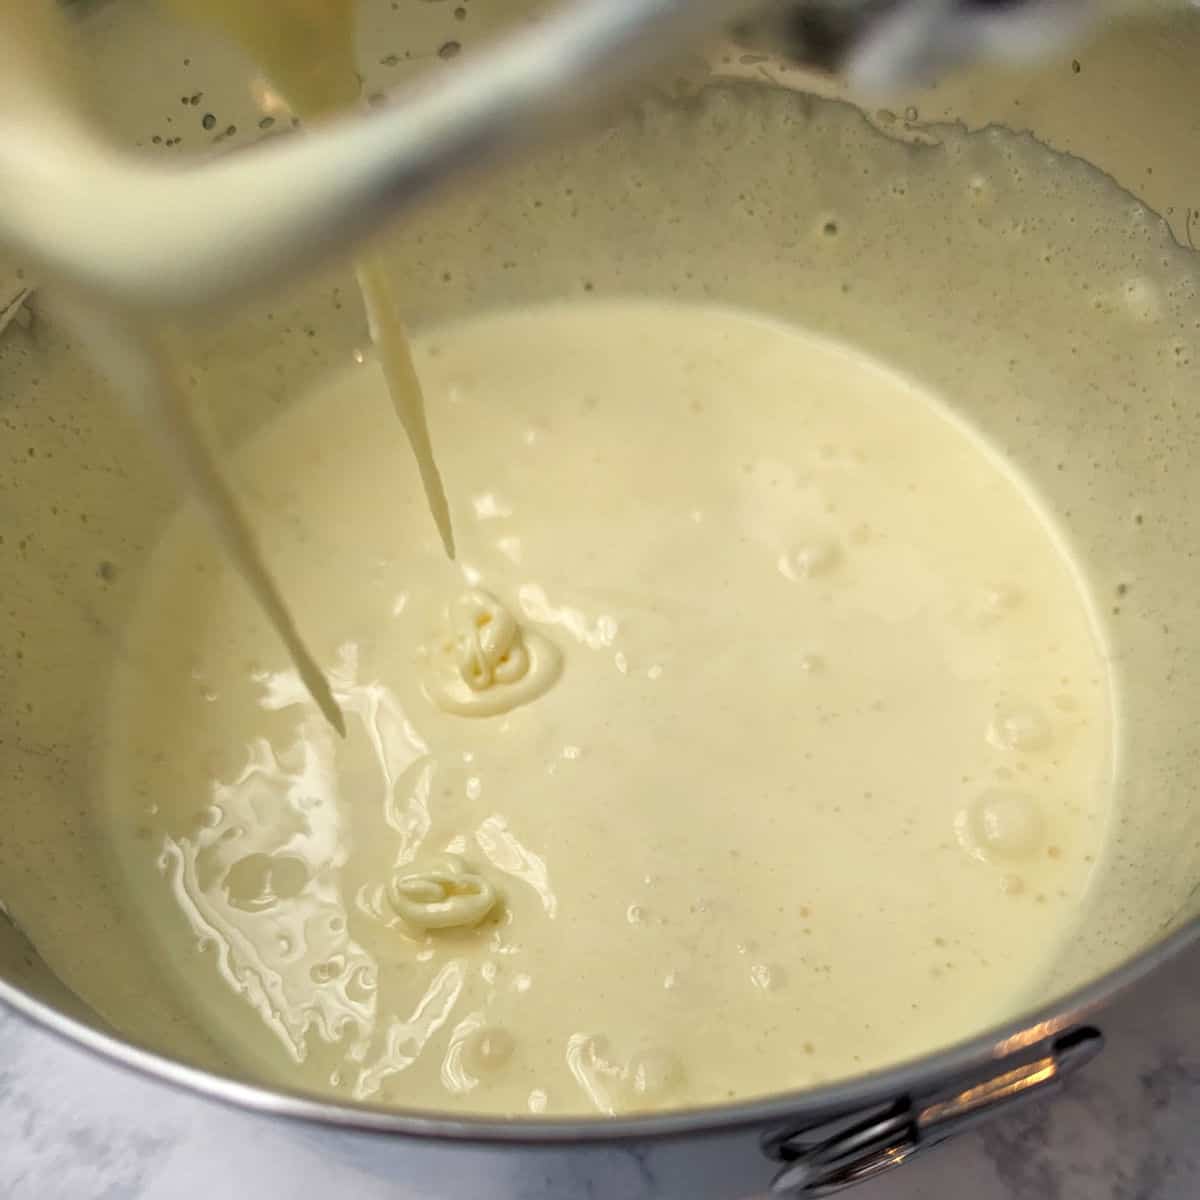
- Place the egg yolks in another medium or large bowl. Use the same beaters (no need to wash) to whip the egg yolks on high speed. Add remaining sugar in 4 stages, a little at a time.
Then, mix until the mixture is very thick. This can take up to 5 minutes. Mixture is ready when drips from the beaters hold their shape for a few seconds before sinking into the rest of the mixture.

- On low speed, beat in the cocoa powder, vanilla, and salt into the thickened egg yolks. Mix until smooth.
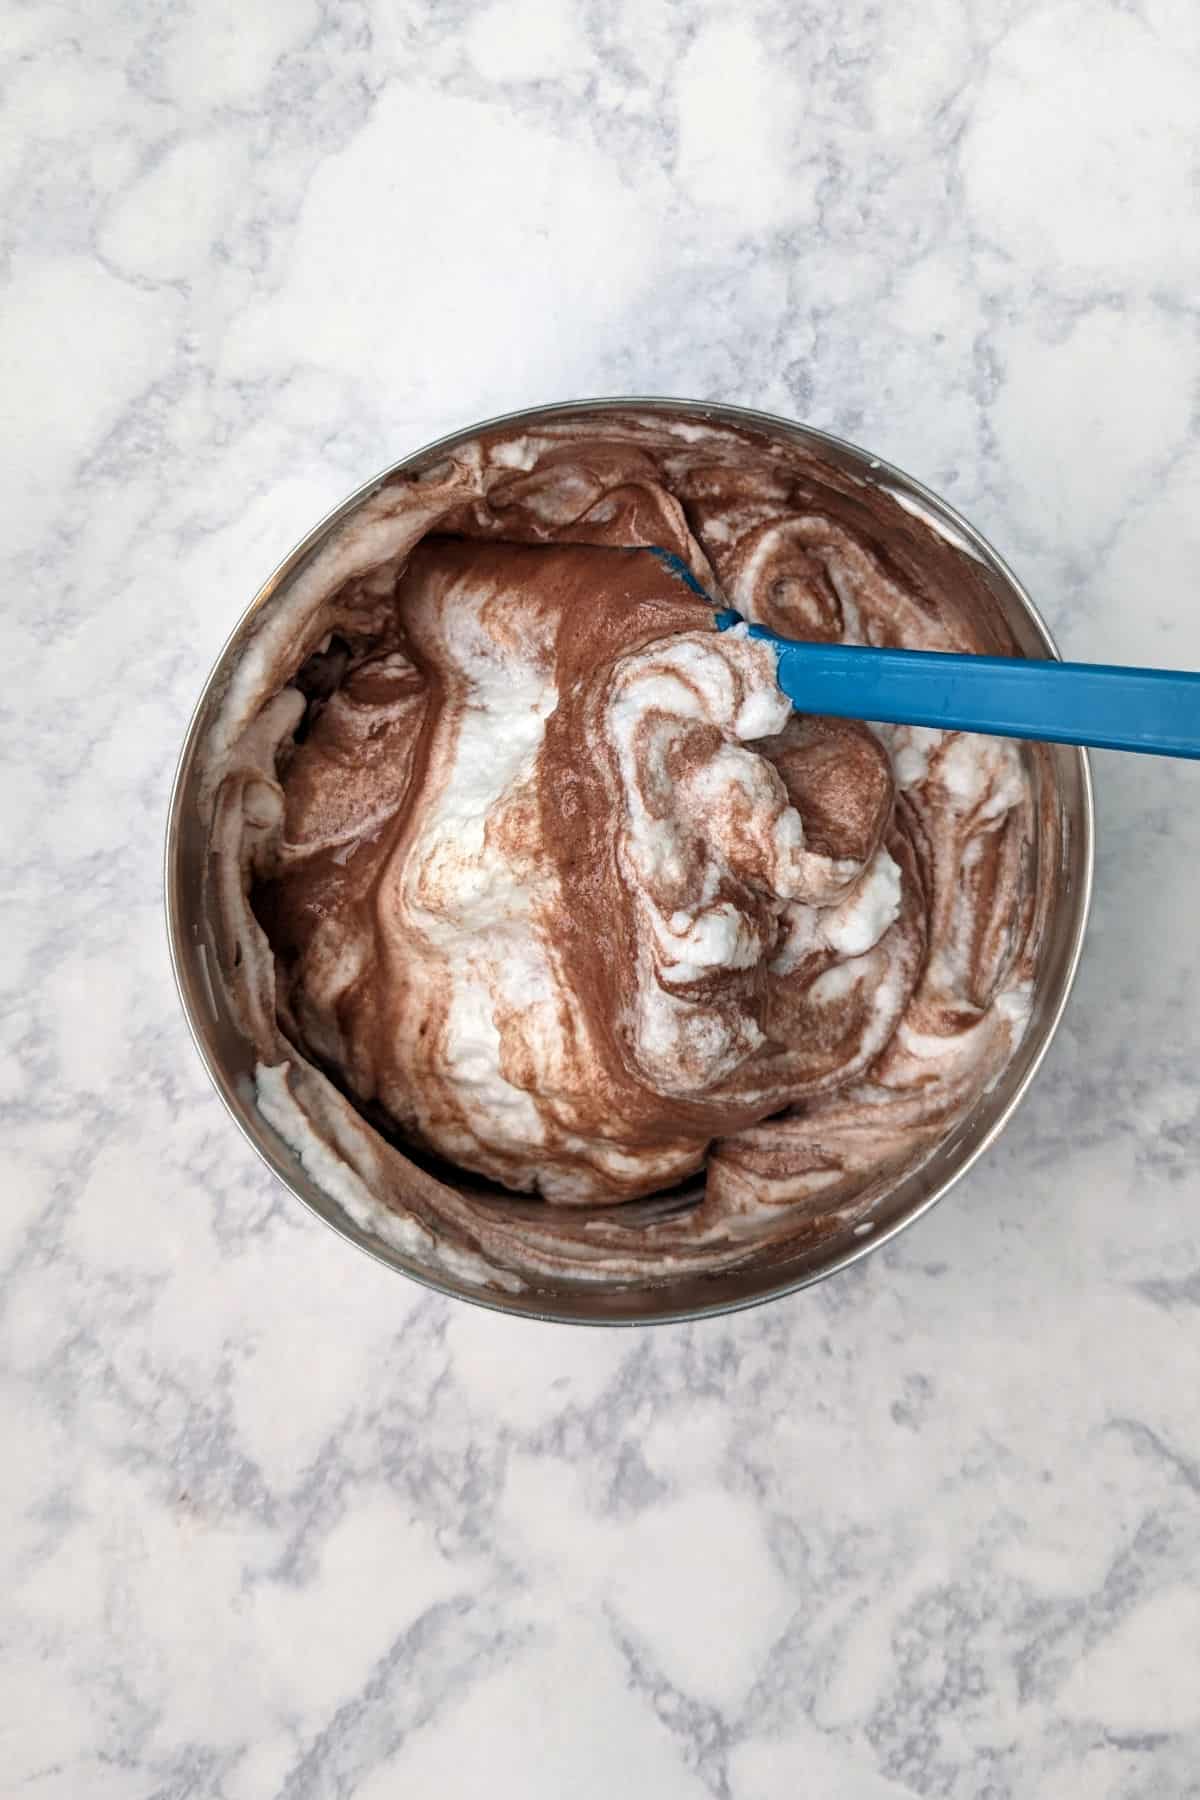
- Mix a small amount of egg whites into the cocoa mixture to lighten it. Then, use a rubber spatula to fold half the cocoa mixture into the egg whites. Repeat with the remaining cocoa mixture.
To fold, I cut the spatula's flat edge down through the middle, scrape along the bottom toward the side, and scrape up the side of the bowl from the bottom to fold that batter over.

- Eventually, no egg whites are visible. Smooth out little bumps gently, to break them up if they're clumps of whites.
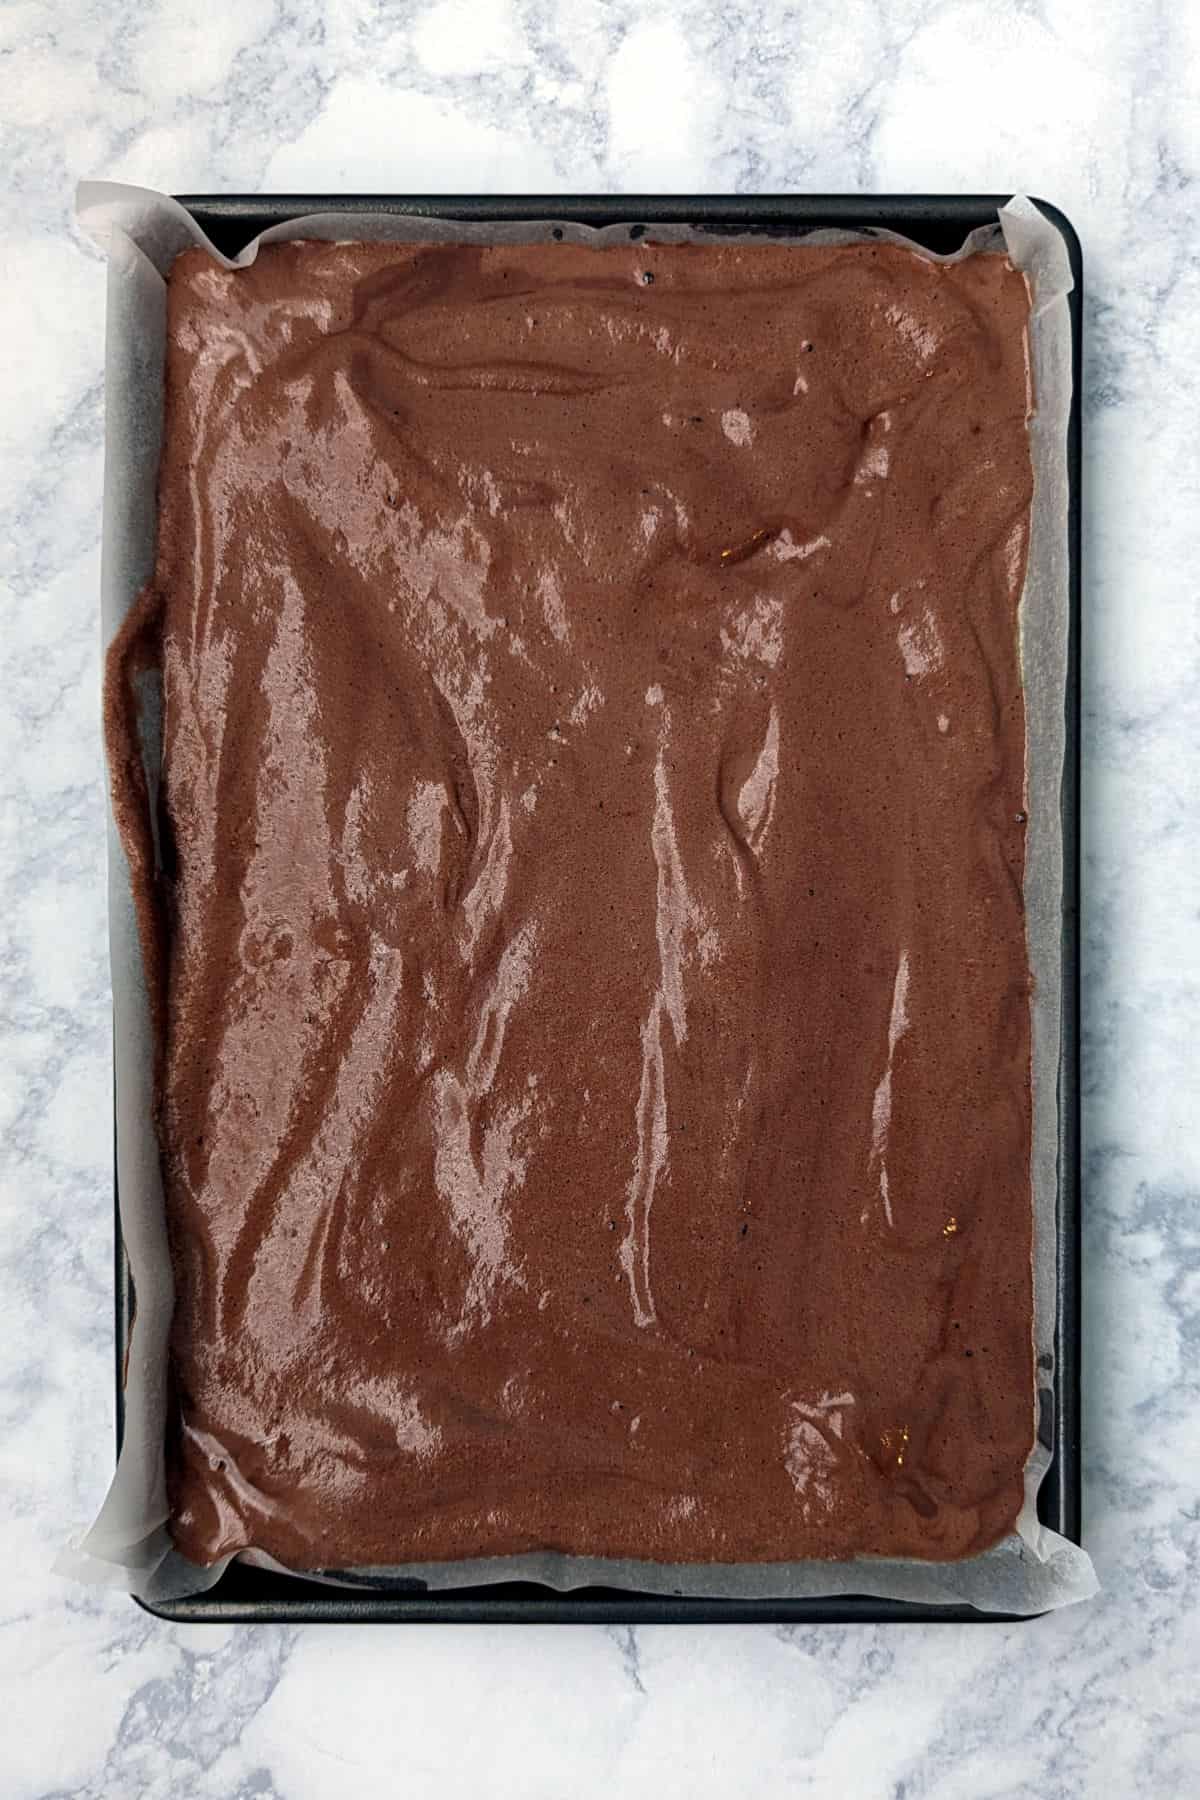
- Spread the batter into the prepared pan, including into the corners. The batter does not spread sideways as it bakes.
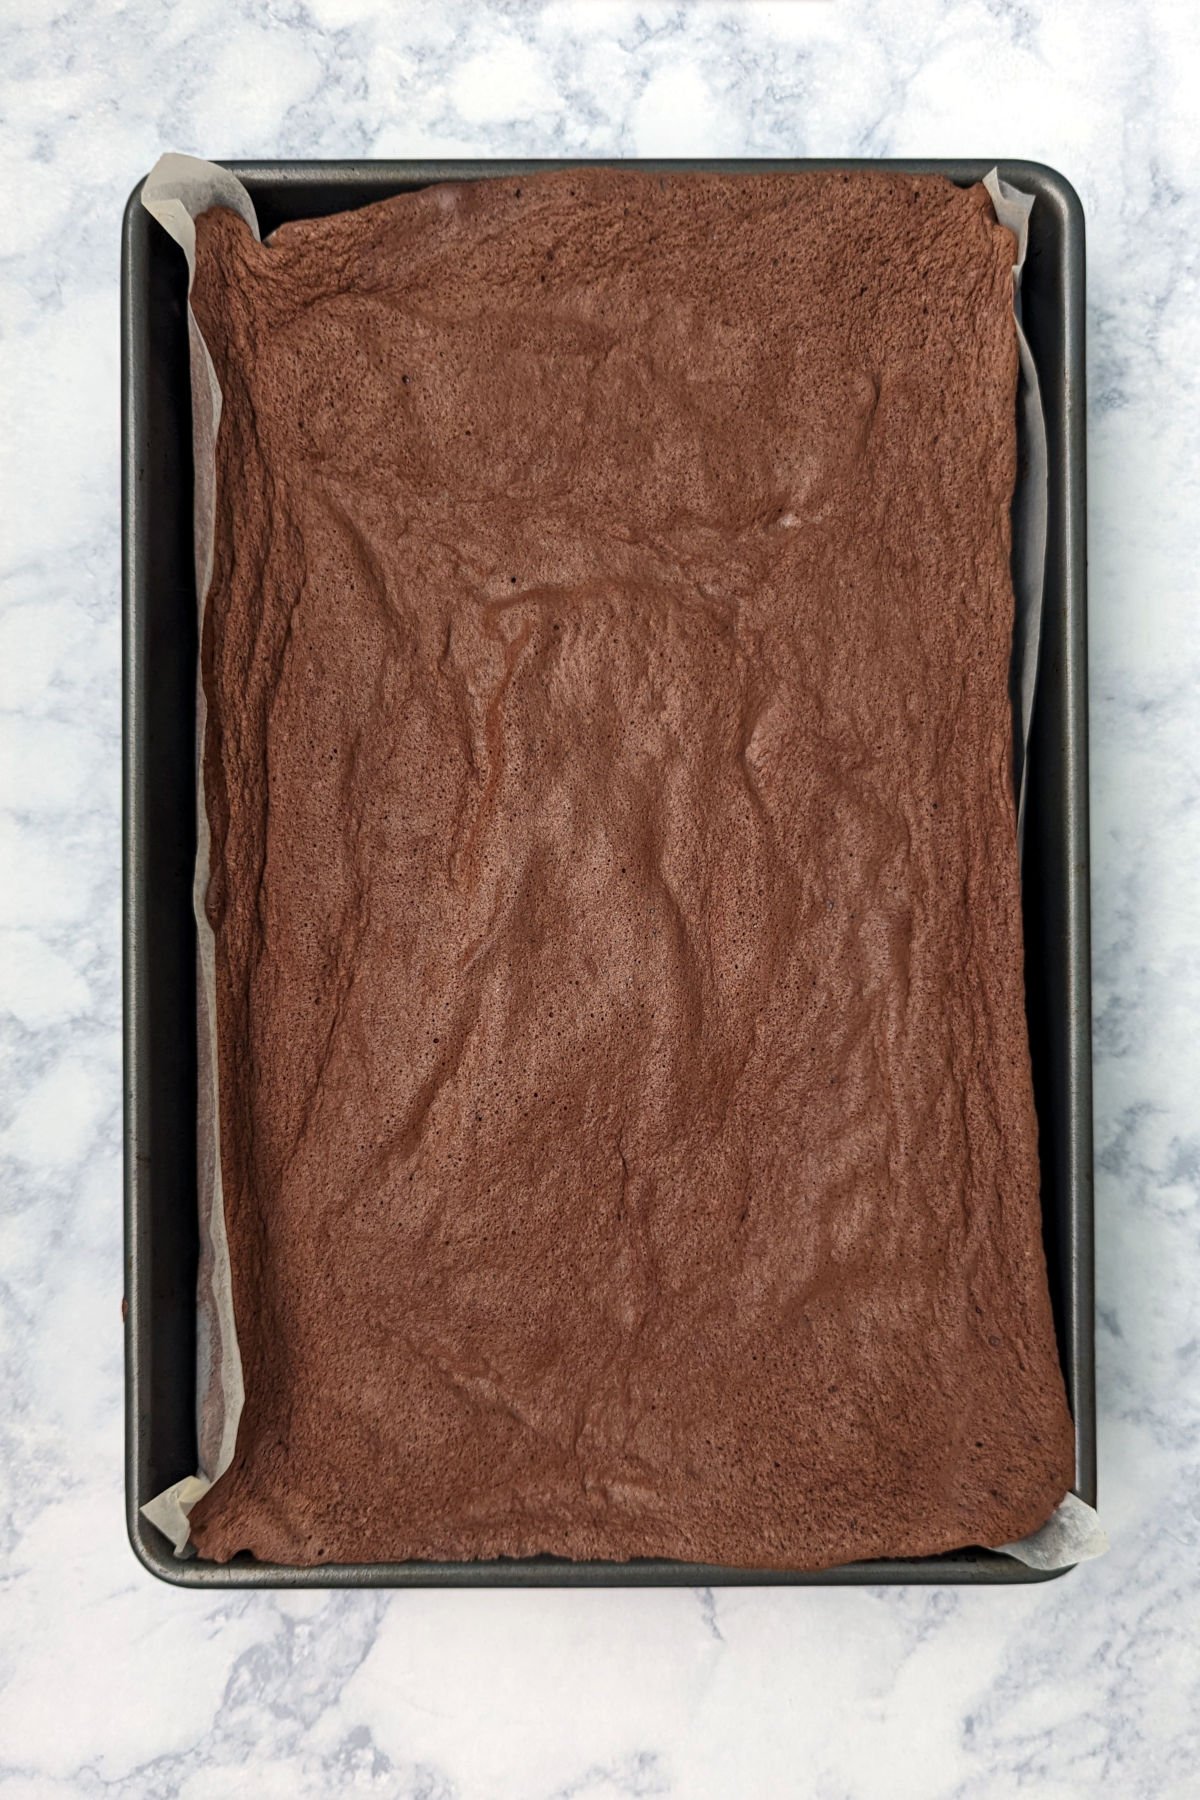
- Bake the cake for about 15 minutes, until the surface springs back when you touch it. If it sounds overly squishy or fizzy, or doesn't bounce back, bake another minute or two. A toothpick stuck into the cake should come out clean.
As soon as you get the sponge into the oven, prepare the tea towel.
Roll and Cool
Get the tea towel ready to roll up, because you'll need it immediately when you pull the cake from the oven!
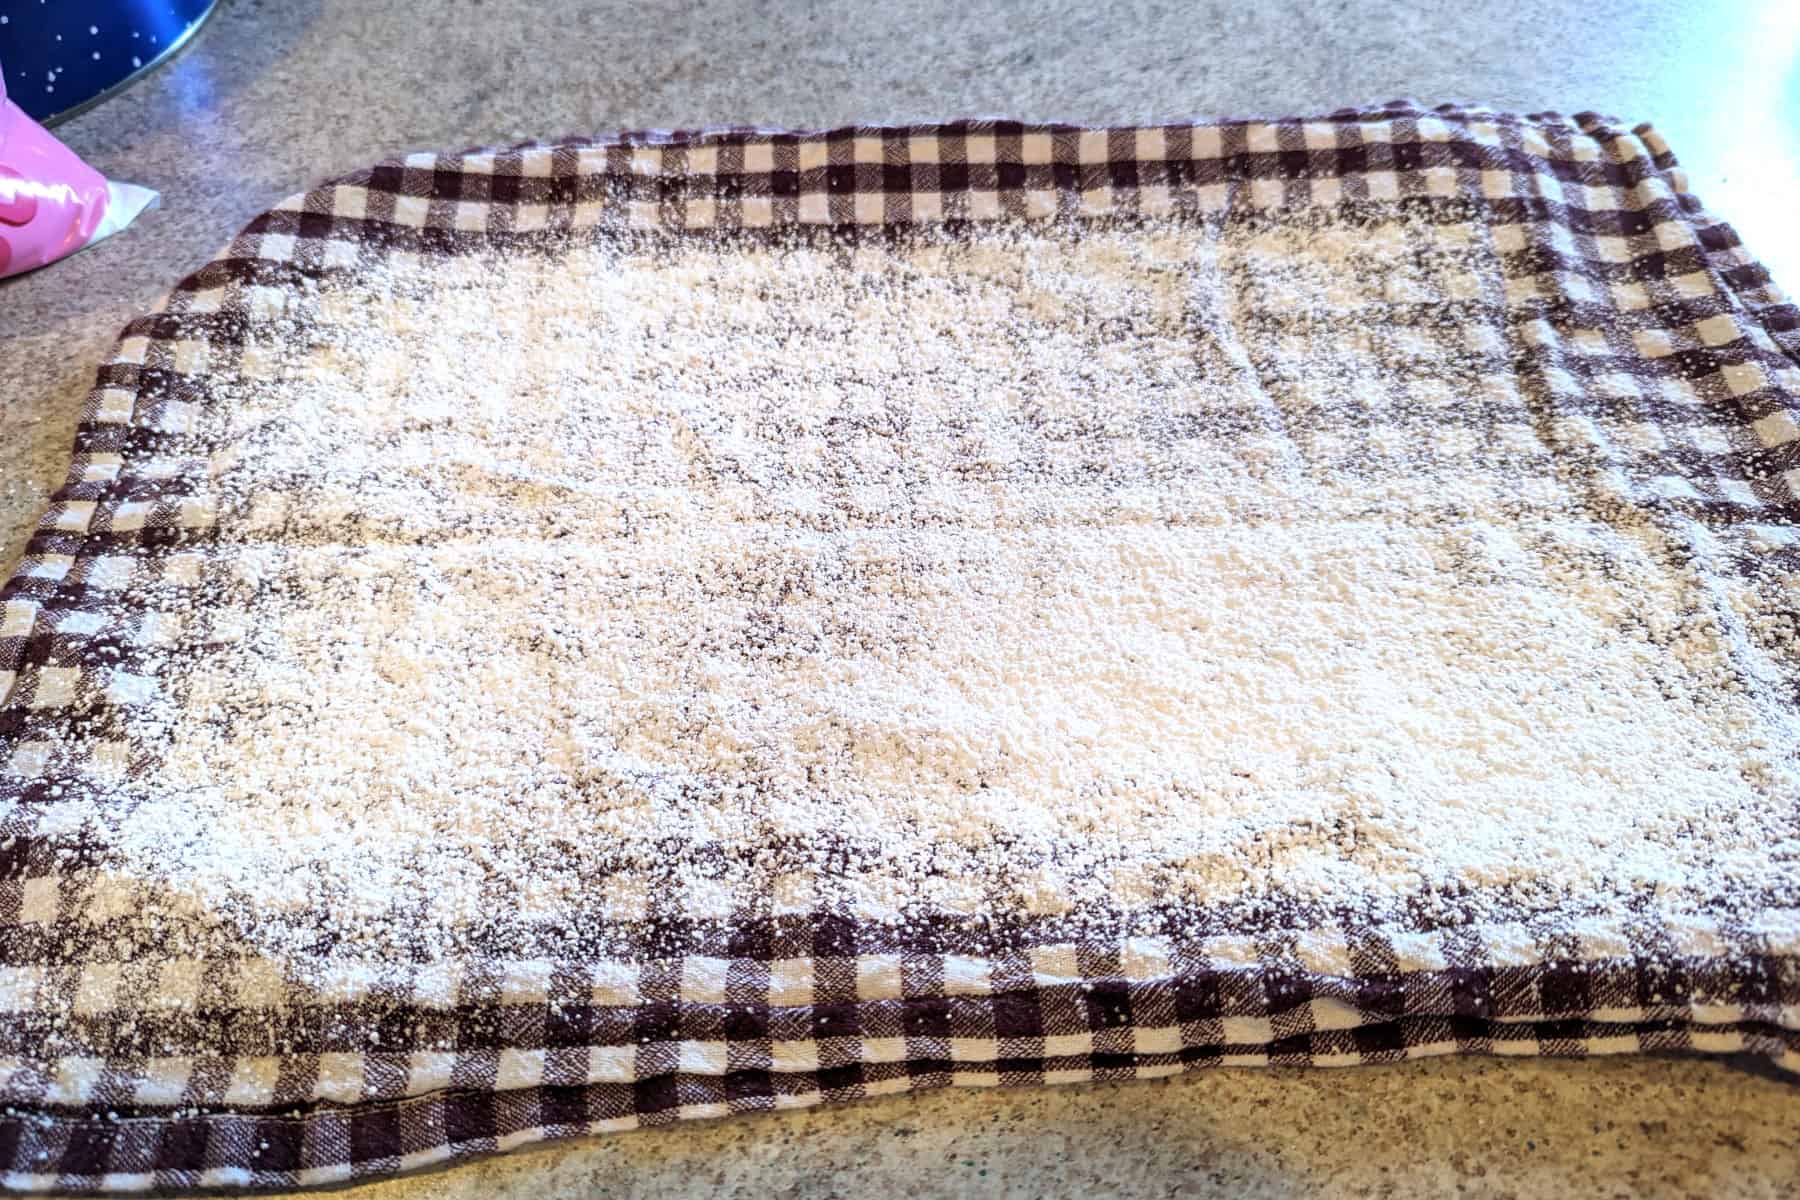
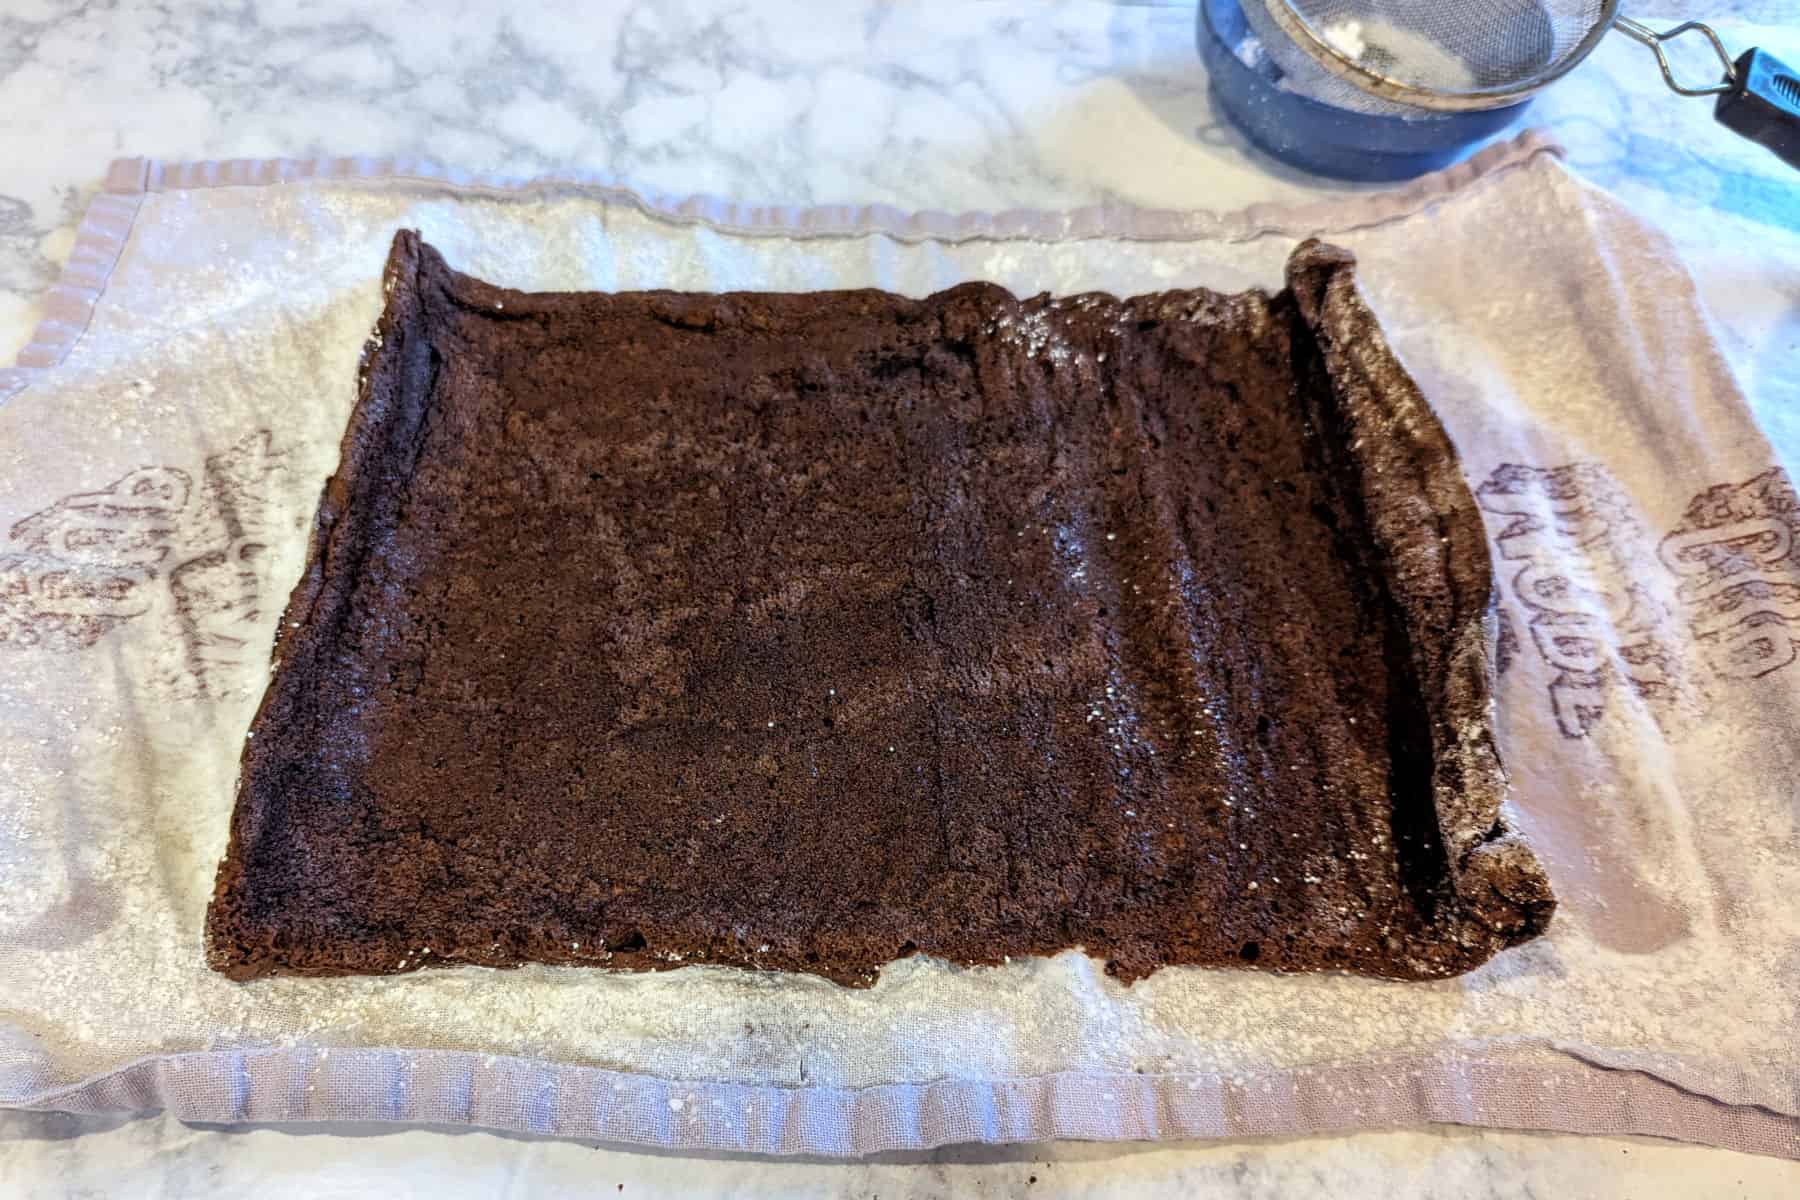
- Lay out a clean, lint-free tea towel that is a little larger the pan. Dust it liberally with powdered sugar. You will roll up the cake in this towel, which will absorb some of the steam as the cake cools.
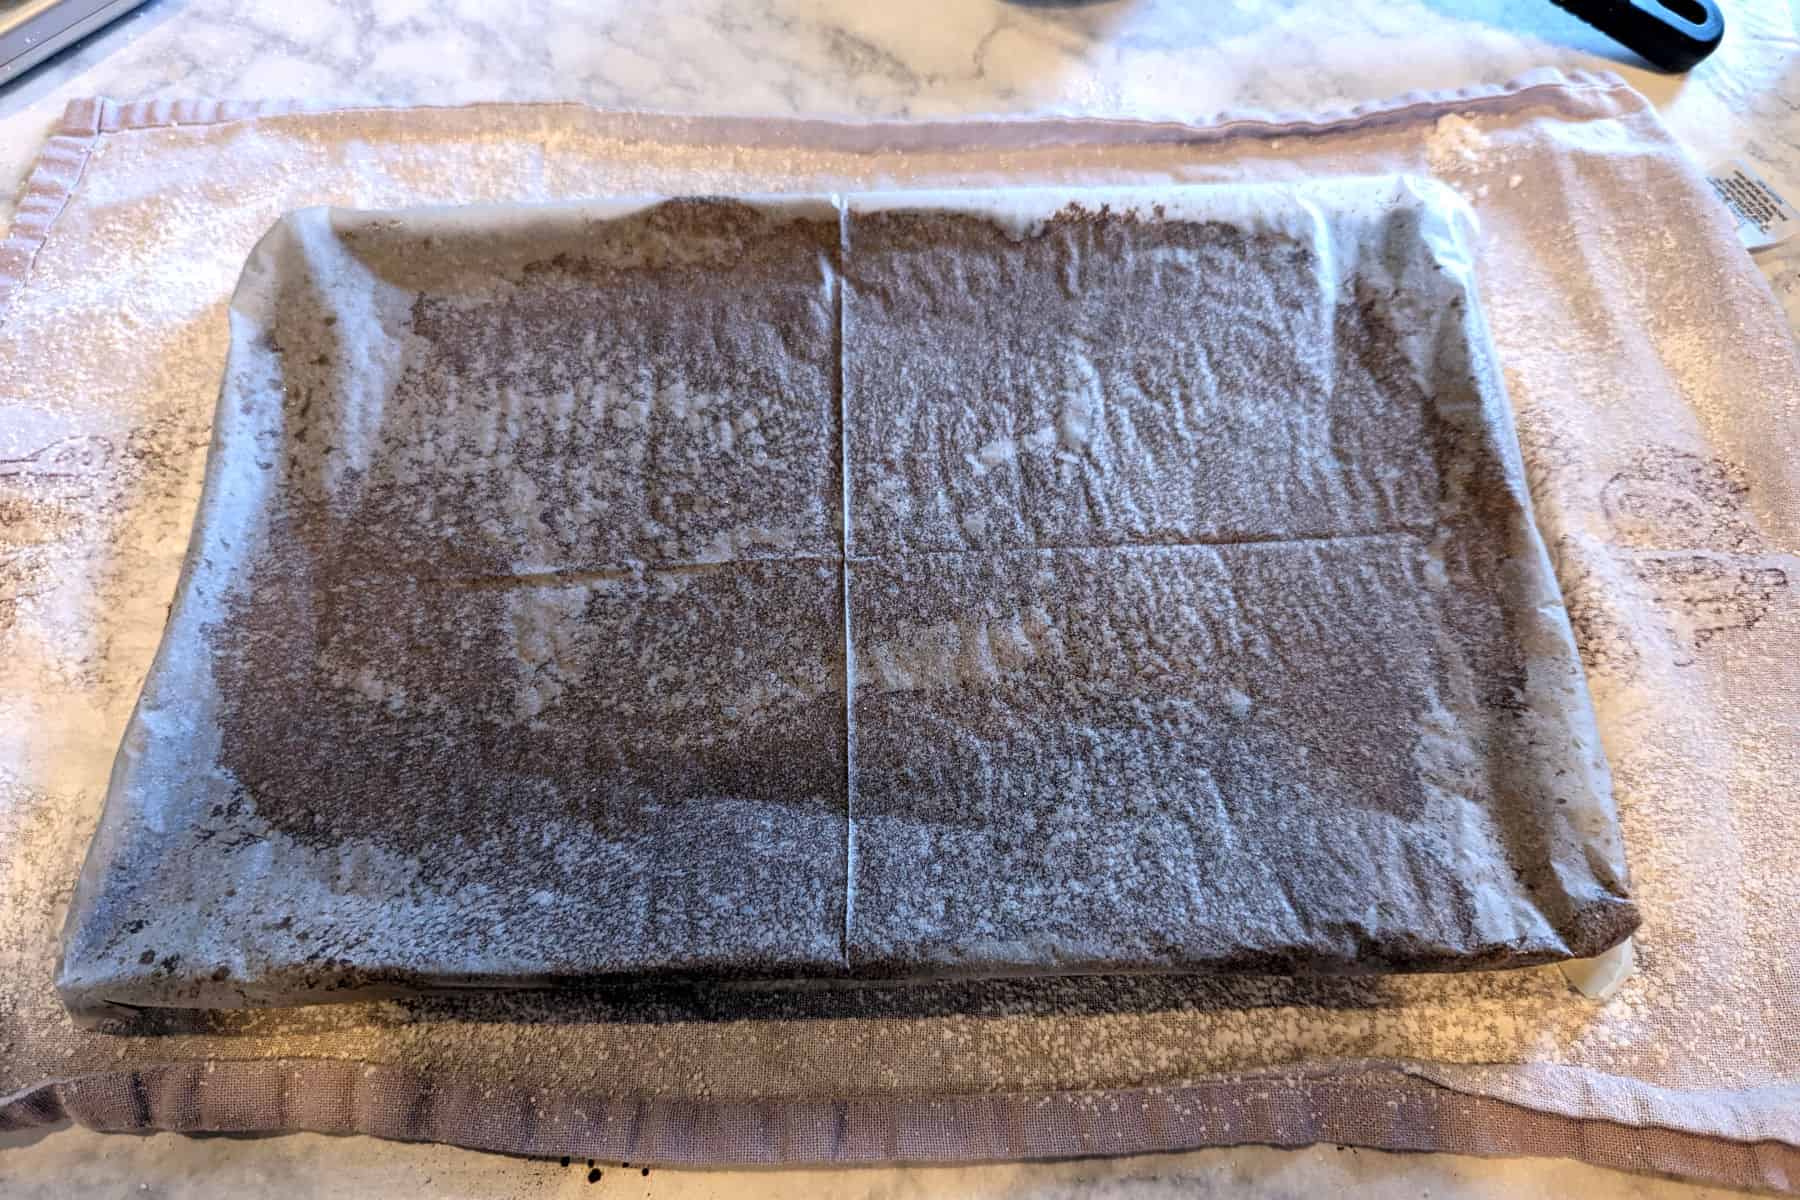
- Immediately turn the hot cake out onto the prepared tea towel.
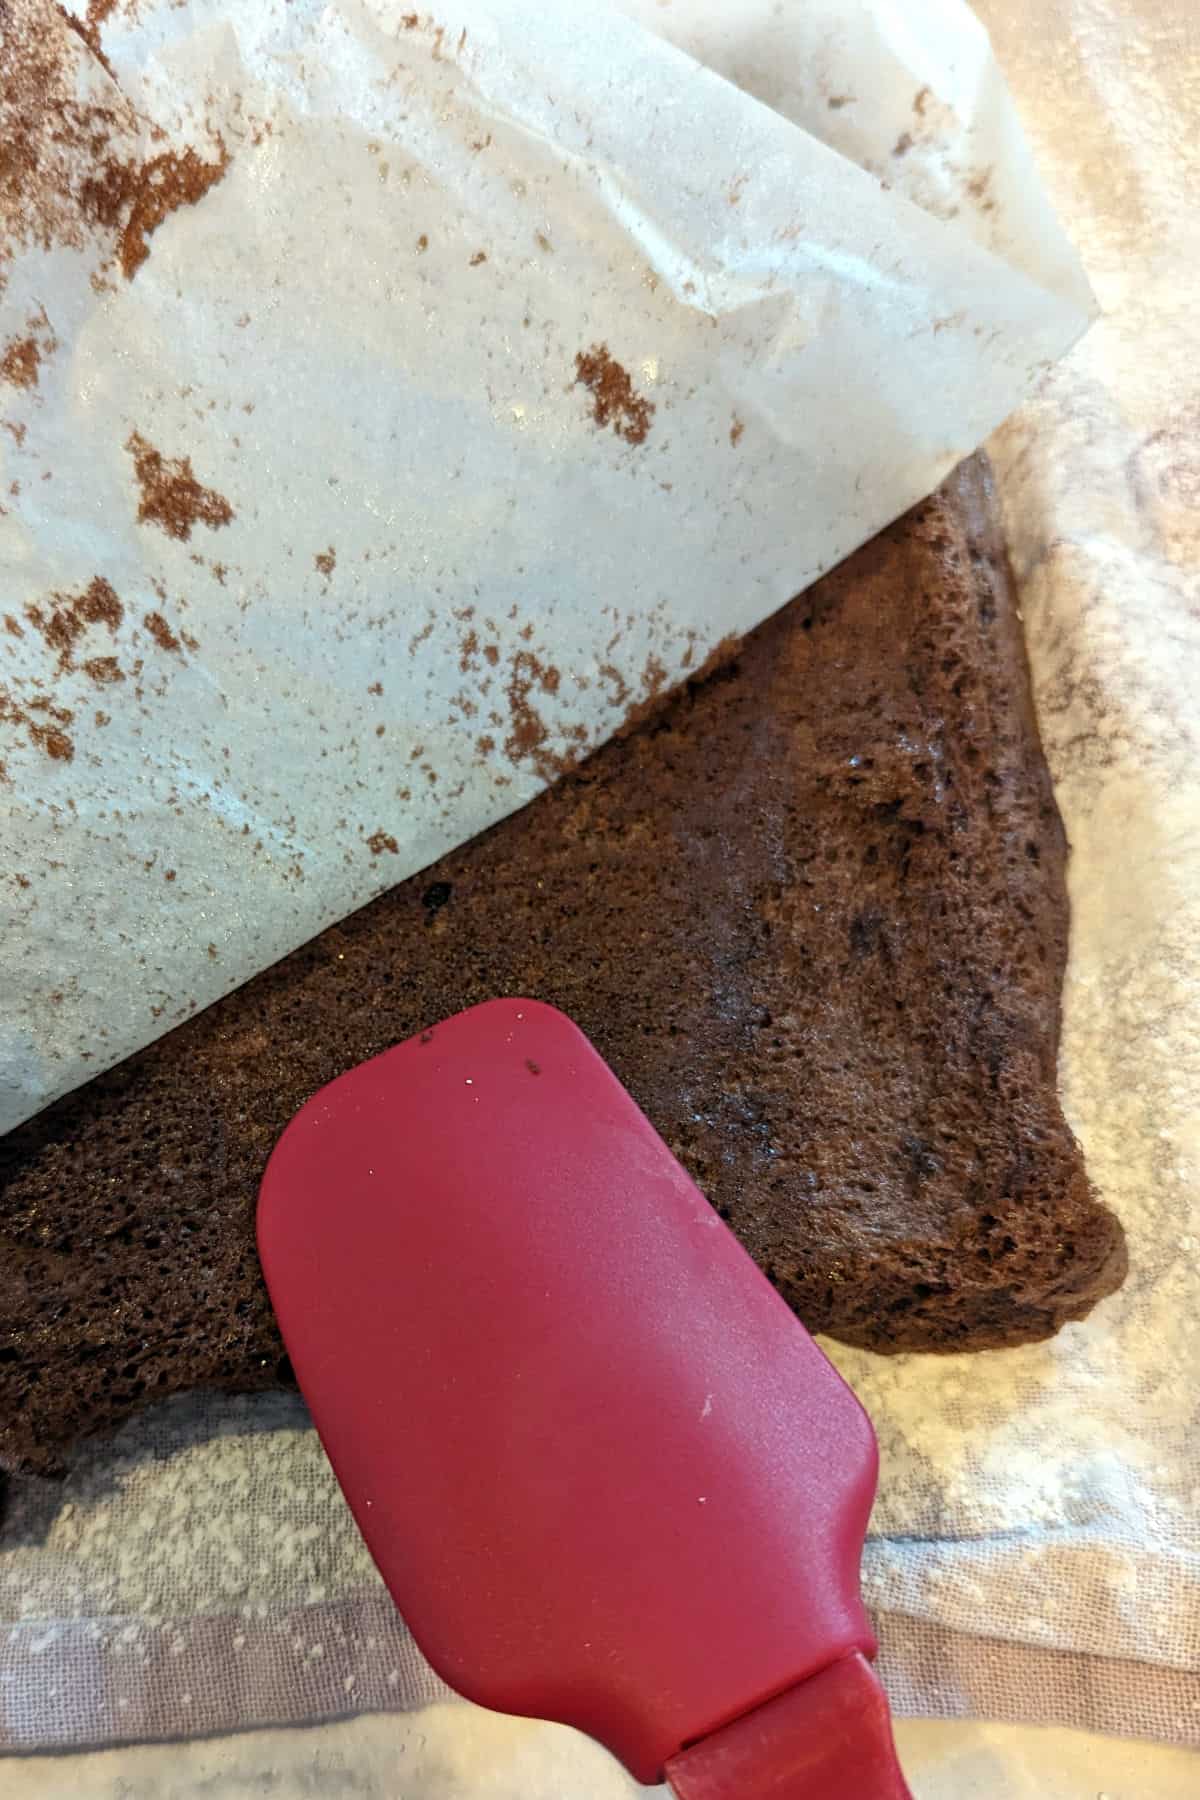
- Carefully peel off the parchment paper. If the cake sticks at all, use a rubber spatula to gently separate it from the paper.
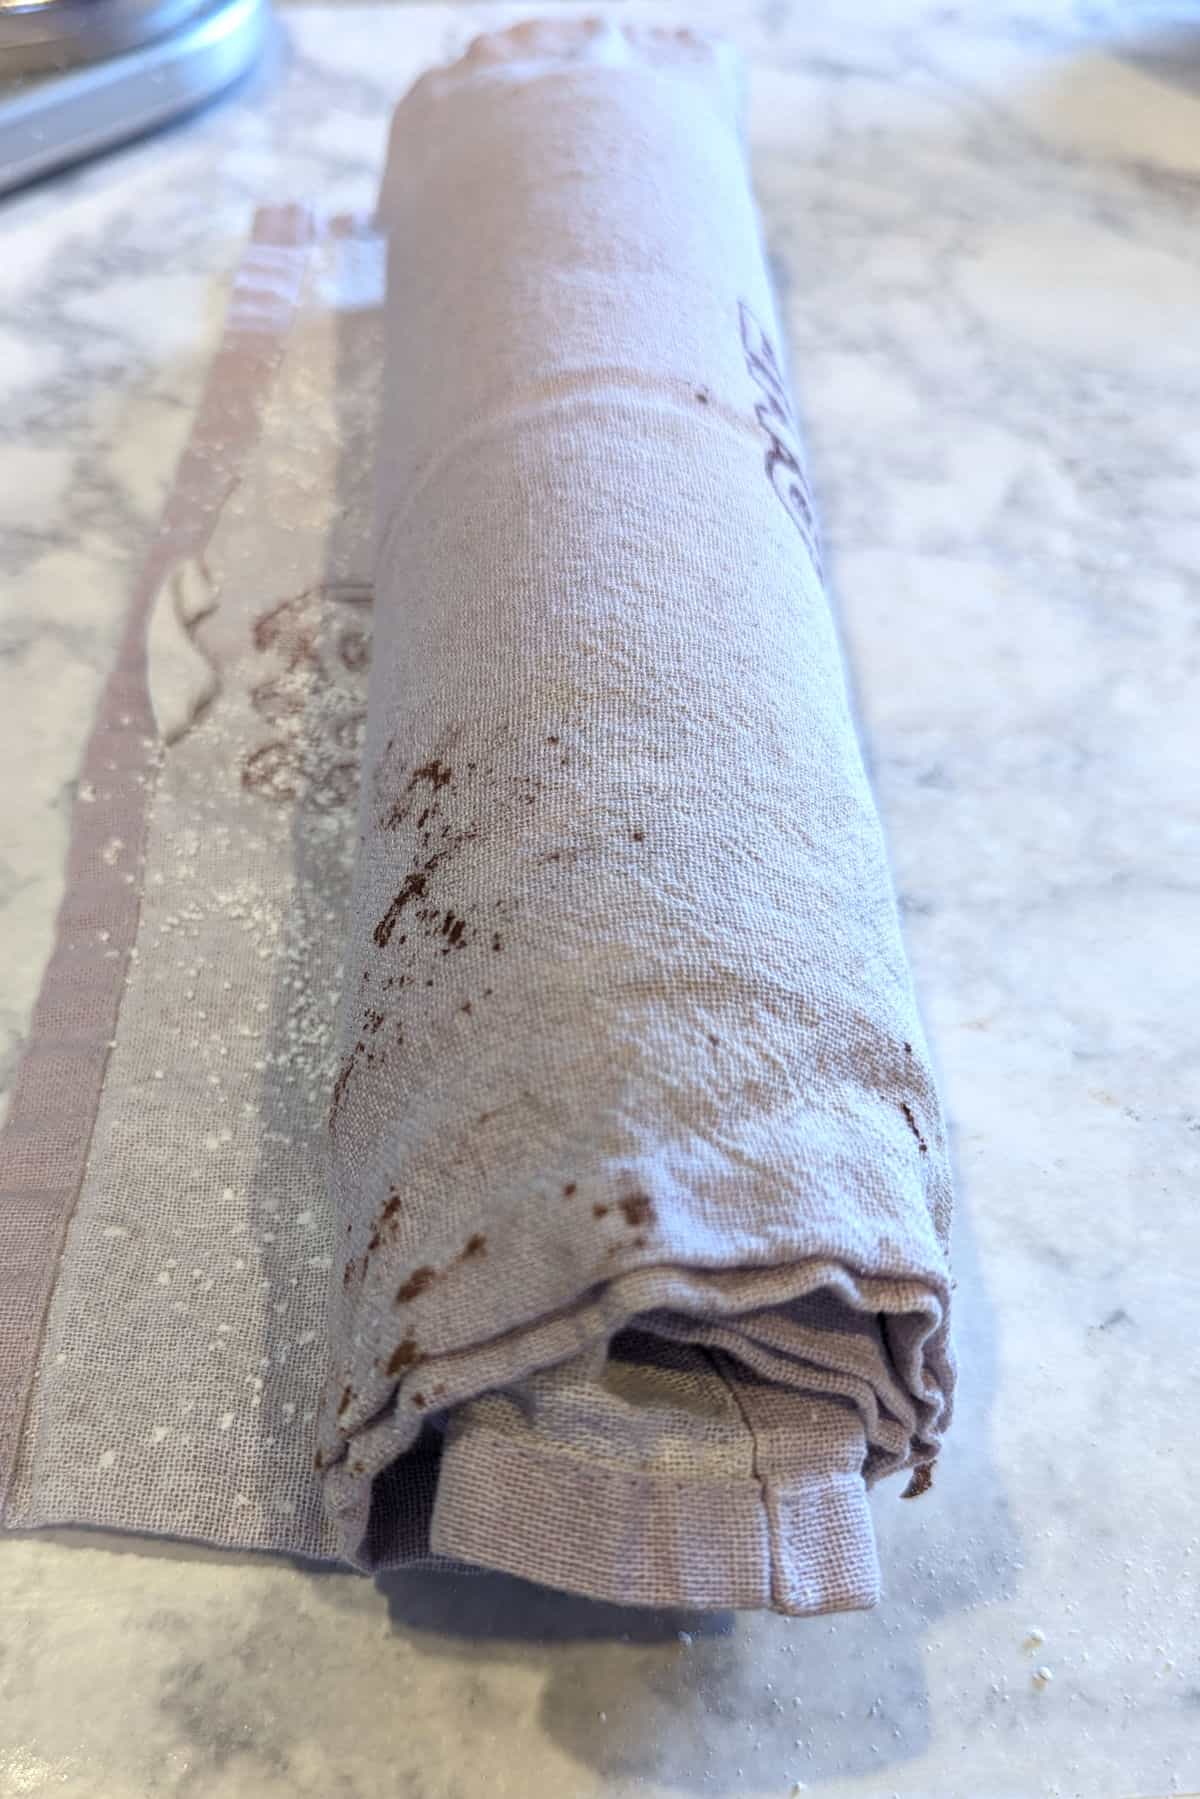
- Starting along a short end, tightly roll up the cake and place it on a cooling rack. Cool completely, about an hour.
I prefer to finish my cake up immediately, but you can leave the cake rolled in the tea towel for several hours if necessary.
Note: If you snag a piece of sponge cake that stuck to the pan, you'll notice it's not that sweet or tasty. That's by design! It becomes magic when paired with whipped cream.
Make Ganache
After the cake has cooled for 30 minutes, and 30 minutes before you plan to assemble, make the ganache to top the cake. I picked up this stirring process from Dorie Greenspan's Baking: From My Home to Yours (affiliate link). Although it sounds finicky, it yields a shiny, smooth ganache and does not overheat the chocolate.
Place the chocolate in a heat-safe bowl.
In a small saucepan, bring the cream just to a boil, swirling it occasionally while heating it to keep it from sticking. (It'll overflow if you ignore it and let it fully boil.)
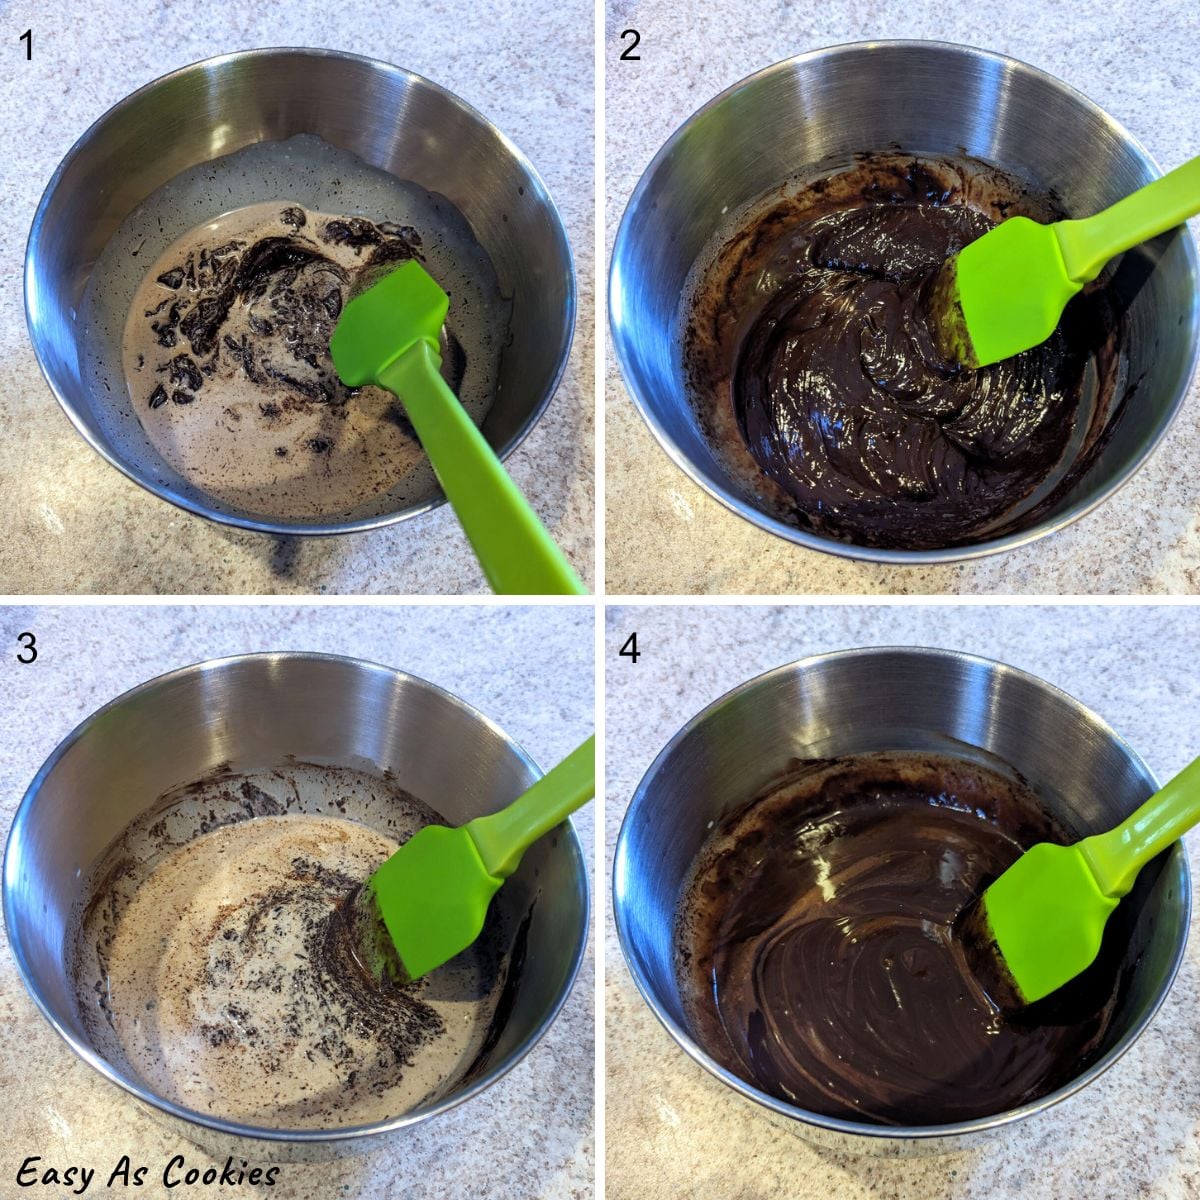
- The process of stirring together the ganache:
- 1. Pour half of the hot cream over the chocolate, and let it rest for 30 seconds to let the chocolate soften. Begin to stir in small circles, starting at the center of the bowl, then spiral out to the edge.
- 2. Continue stirring in spirals from the center to the edge (like a reverse whirlpool) until everything is mixed.
- 3. Add the remaining cream, let rest for 30 seconds, and stir in spirals again...
- 4. ...until the chocolate is melted and combined with the cream, stirring only as much as necessary.
Let the chocolate ganache rest at room temperature for about 30 minutes, until you roll the cake. If you wait longer than 30 minutes to assemble the cake, the ganache will be much thicker, and may not drizzle well unless you heat it again.
Whip the Cream
Once the cake is cool, it's time to whip the cream and assemble the yule log.
Cream spatters when you beat it, so you want a large bowl. The cream whips better if you chill the bowl in advance, but it's not strictly necessary.
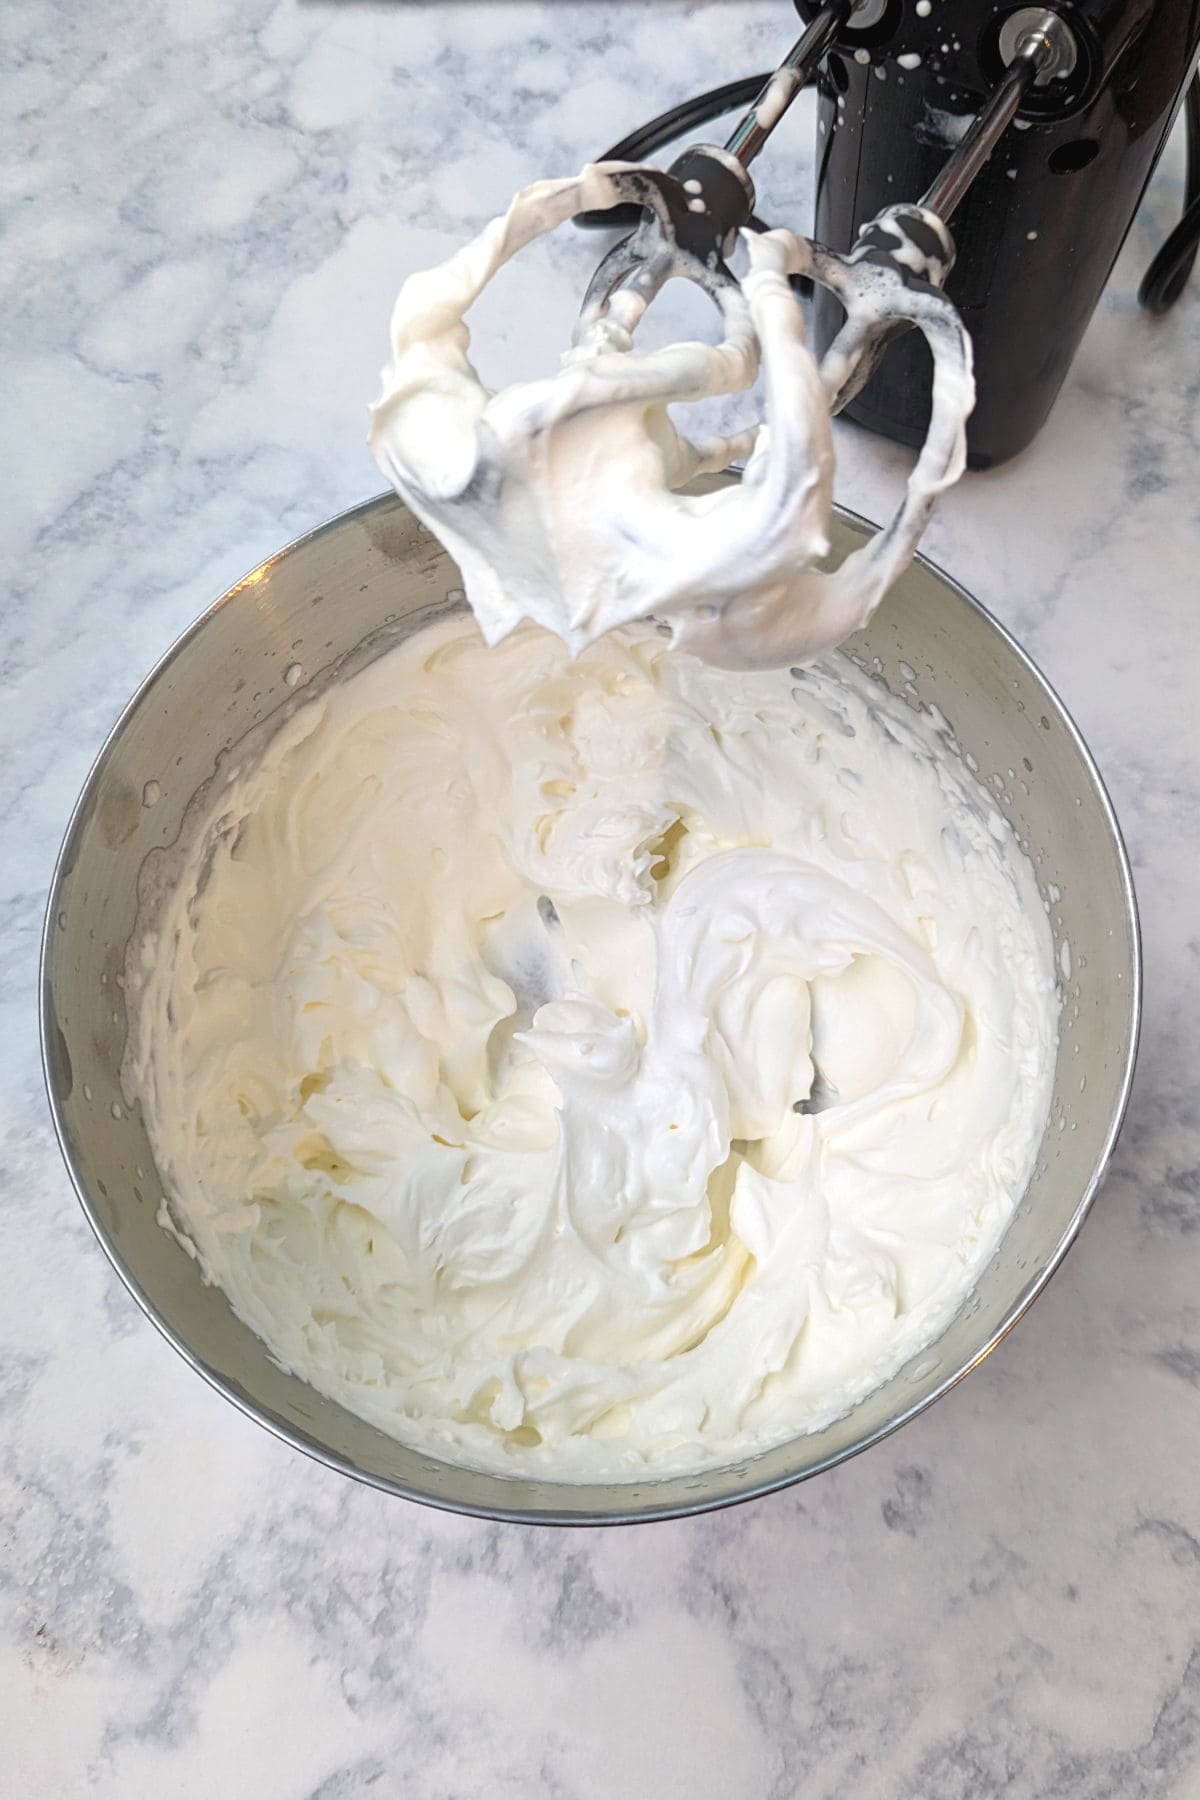
- Combine 1 ¼ cup heavy cream and powdered sugar in a large metal bowl. Use clean beaters to beat the cream until stiff peaks form.
Stiff peaks will not droop when you lift out the beaters. The cream will maintain its shape in the bowl. You can usually see to the bottom of the bowl when you remove the beaters.
Stiffly beaten whipped cream allows the rolled cake to maintain its shape. If the cream is softly beaten, then the cake will slump down.
You can, and should, pause beating from time to time to check the consistency. Don't overwhip! You can always beat the cream for longer, but overwhipping the cream turns it into butter.
Use the whipped cream as soon as you whip it; otherwise, it will deflate and not roll nicely.
Assembly
- Gently unroll the cooled cake.
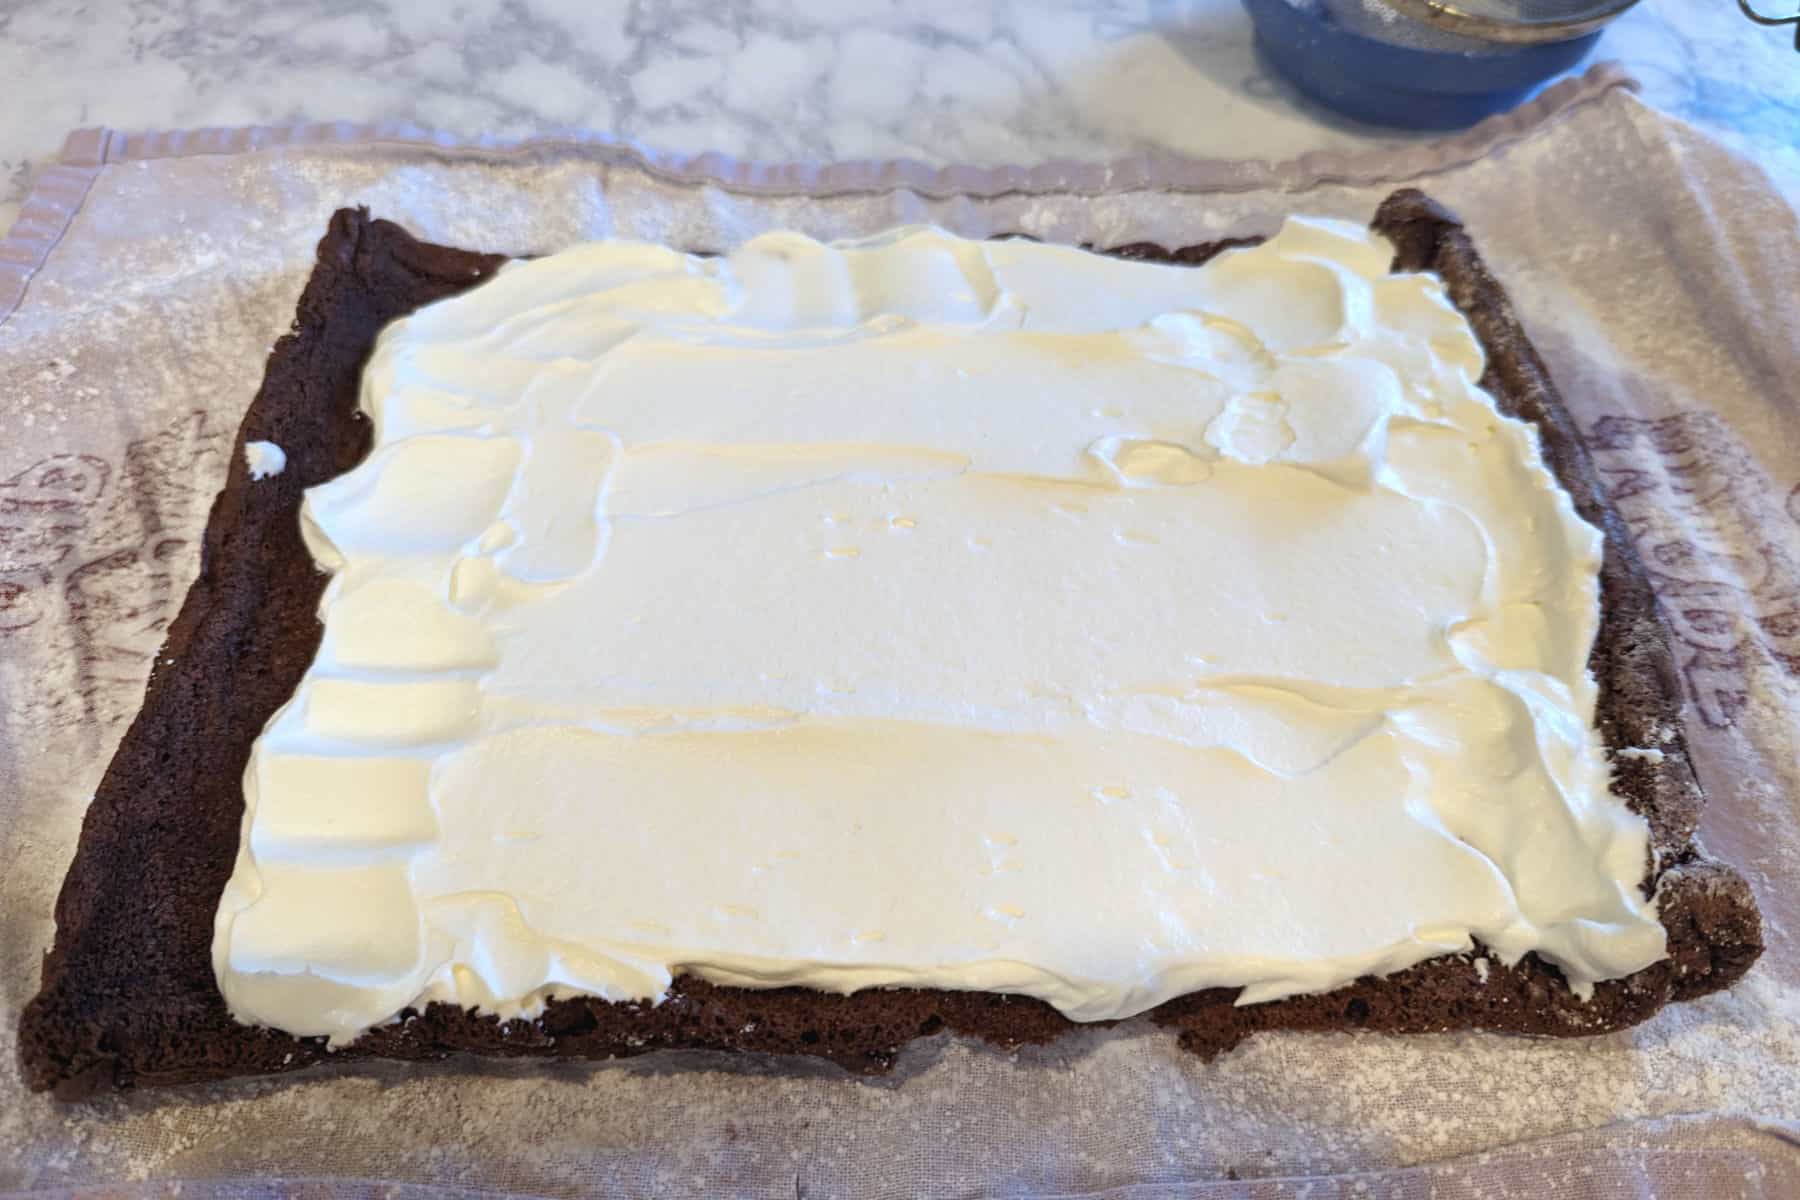
- Dollop the whipped cream along the cake, and gently spread it all the way to the center short edge. Leave a ½ inch margin along the outside long edges, and a 1 inch margin on the outer short edge; cream will squeeze there as you roll.
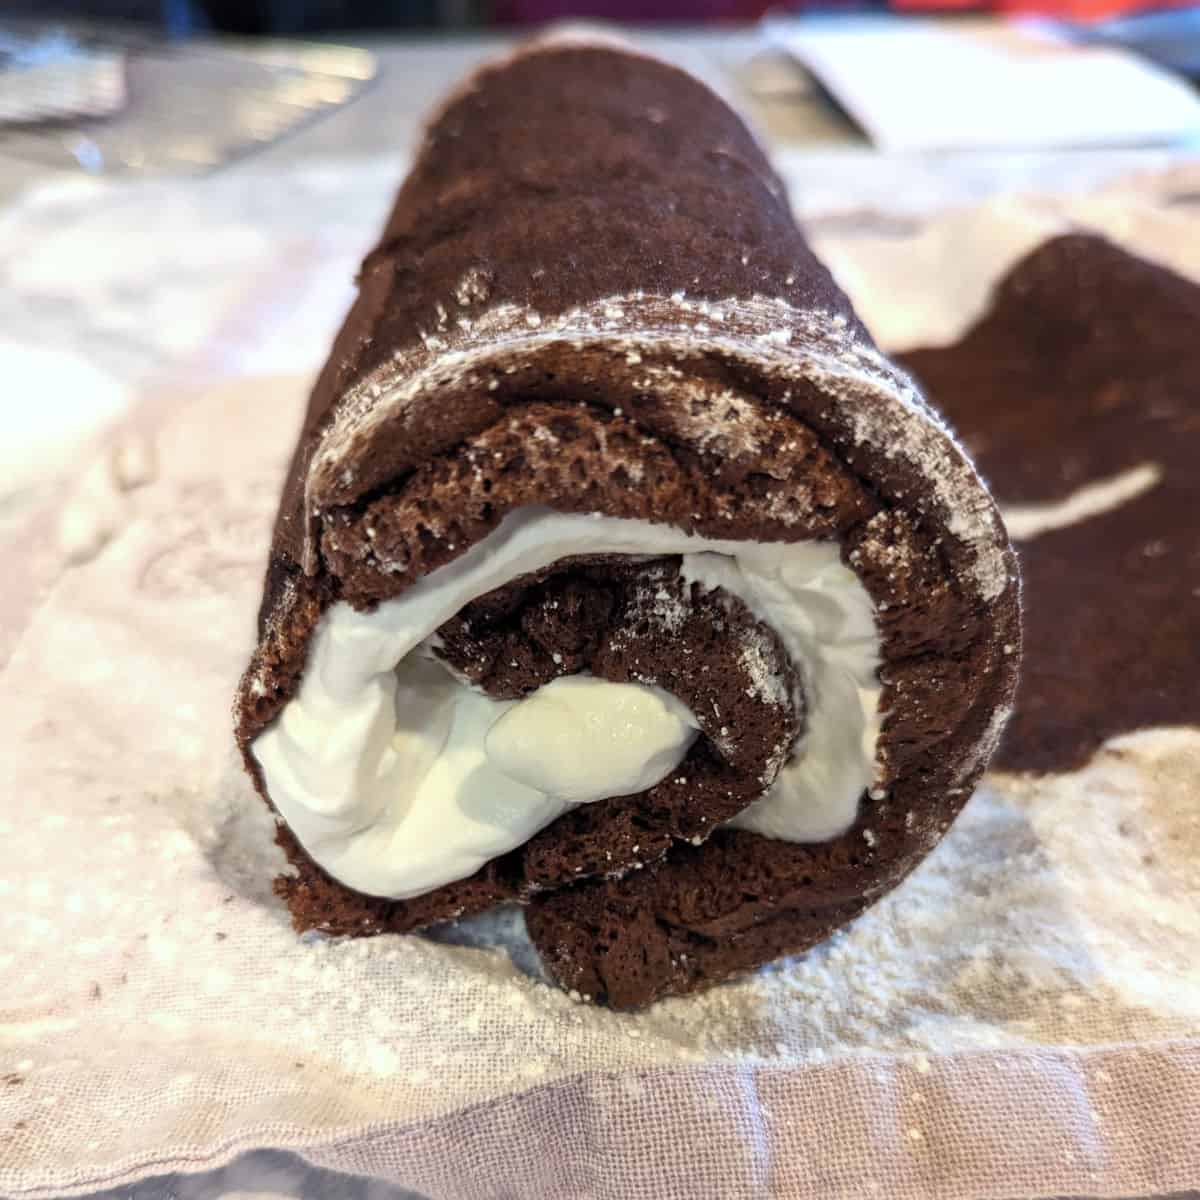
- Roll up the cake, starting at the short center edge. Once rolled, have the outer seam on the bottom; the weight of the cake will help seal it. Your cake will have more cream than the one I photographed here.

- Choose the uglier end of your rolled cake. Cut a small piece off at a diagonal.
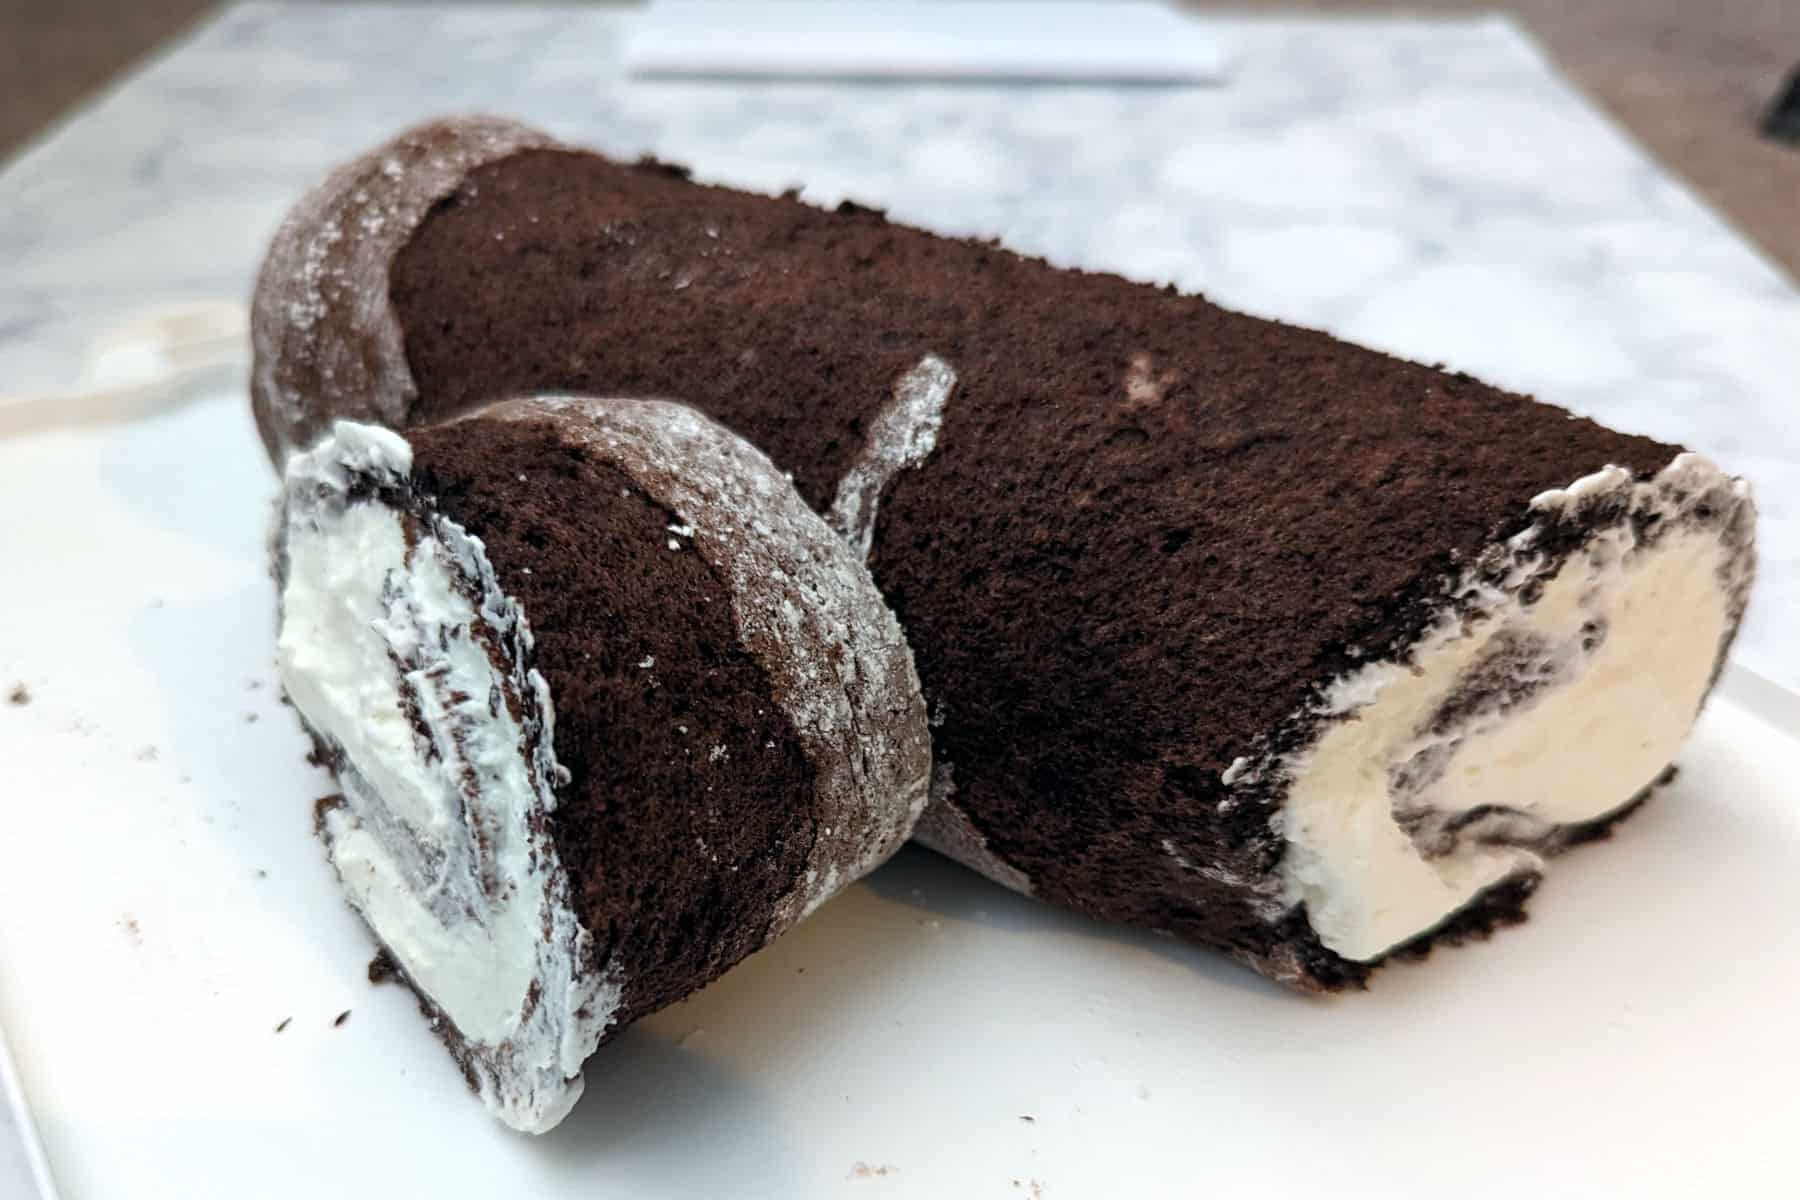
- Use a turning or offset spatula to transfer the main cake onto a platter. Position the cut piece alongside it, near but not too near the other cut edge.
Take a good look at your yule log from a few angles to be sure you like the positioning. I place the outer edge of the branch, and not the cut edge, against the main log; the cut side is prettier.
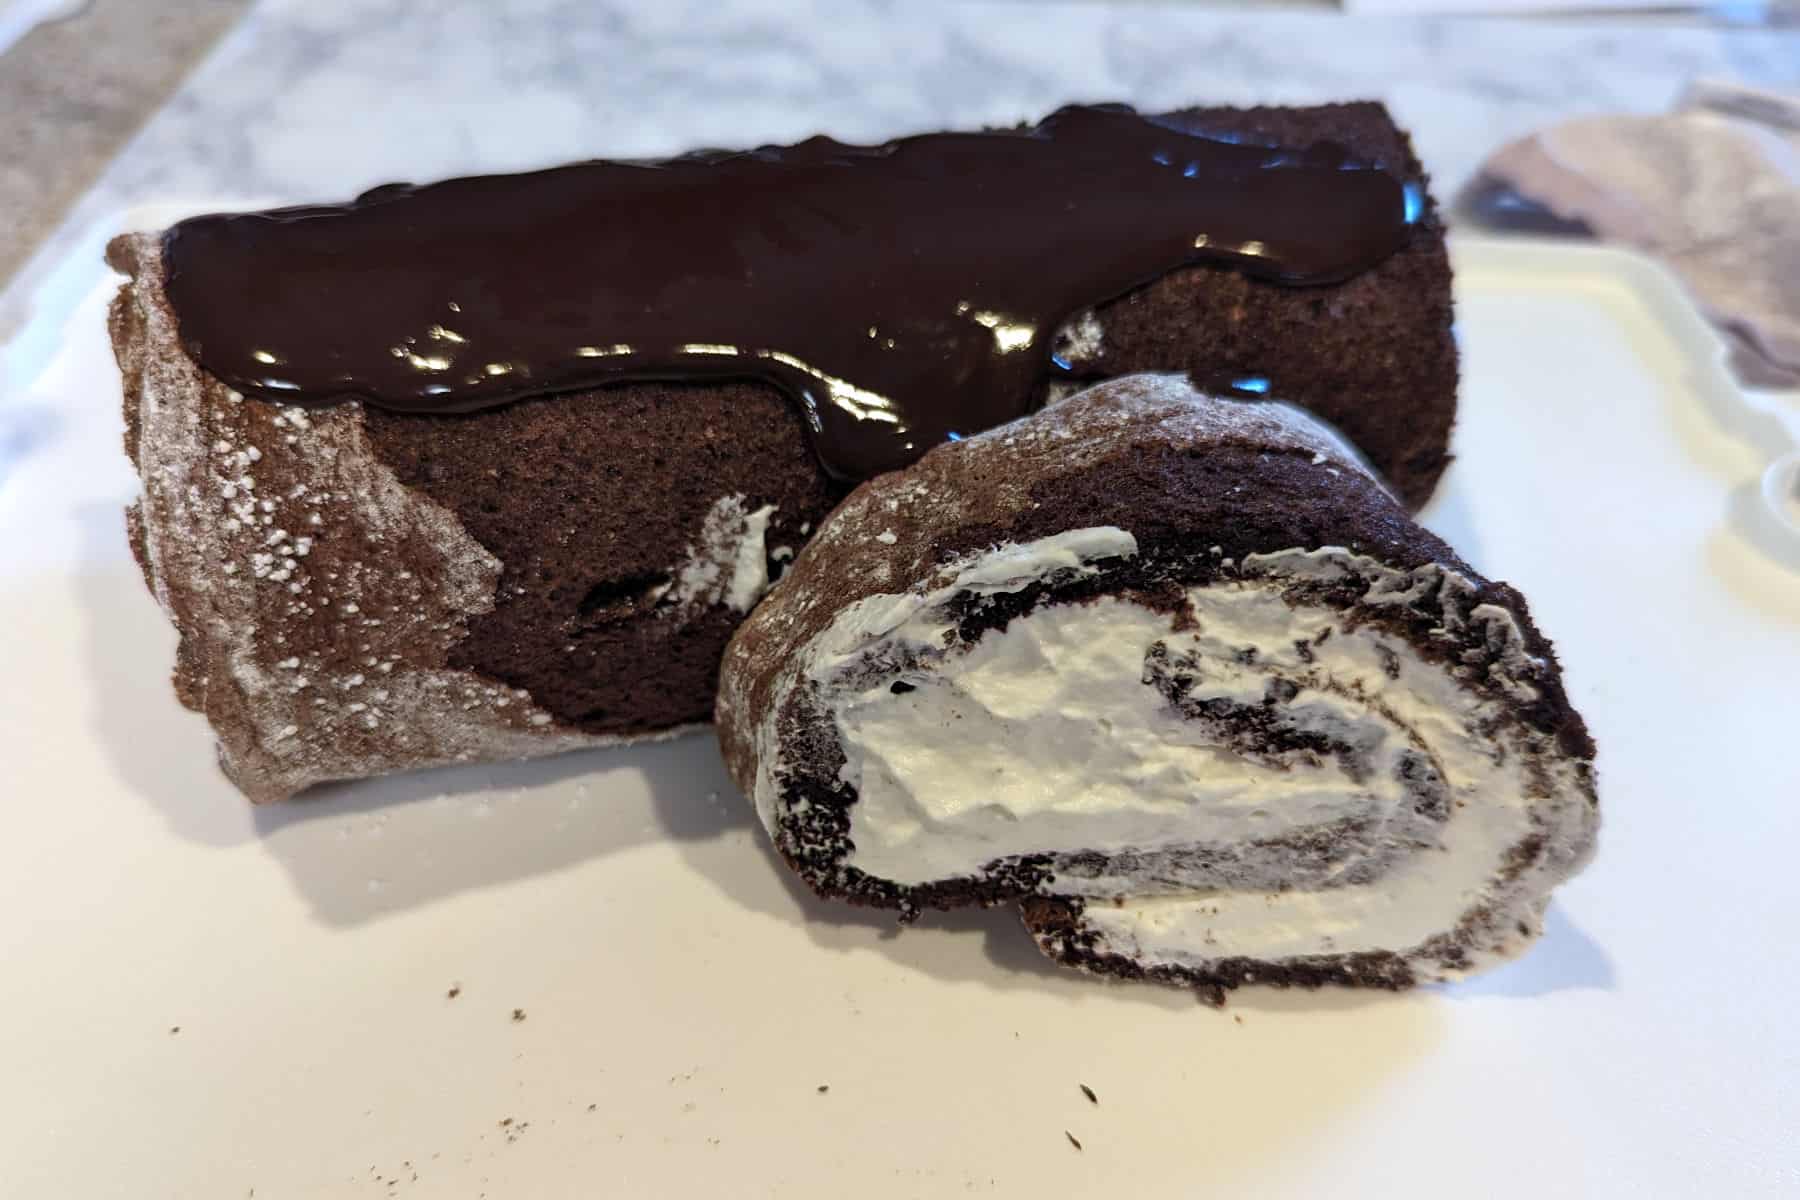
- Using a spoon or spatula, drizzle ganache along the cake, starting in the center. Be patient and go slowly. The ganache should drizzle a little ways down the side.
- Add ganache bit by bit along the sides where the ganache ends. Eventually the entire cake will be coated, but if you have gaps, just add ganache.

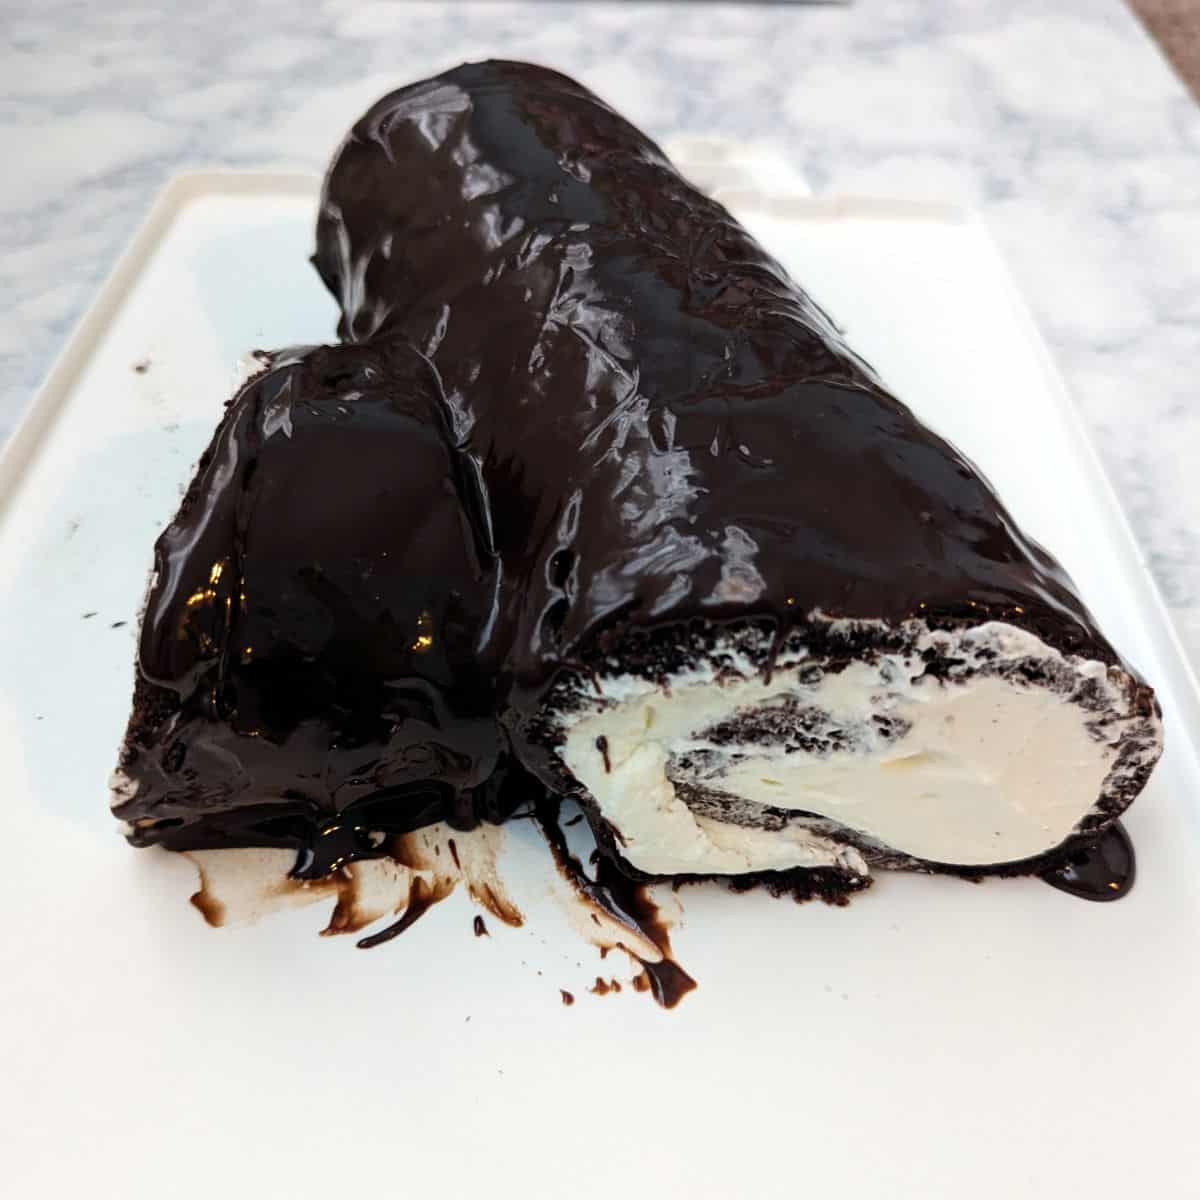
- You can leave cut edges exposed to show the swirl of whipped cream, or you can coat them.
To coat them, just drizzle ganache along the cut ends of the yule log. When the ganache stops halfway down the swirl, add more ganache there and it should meld together.
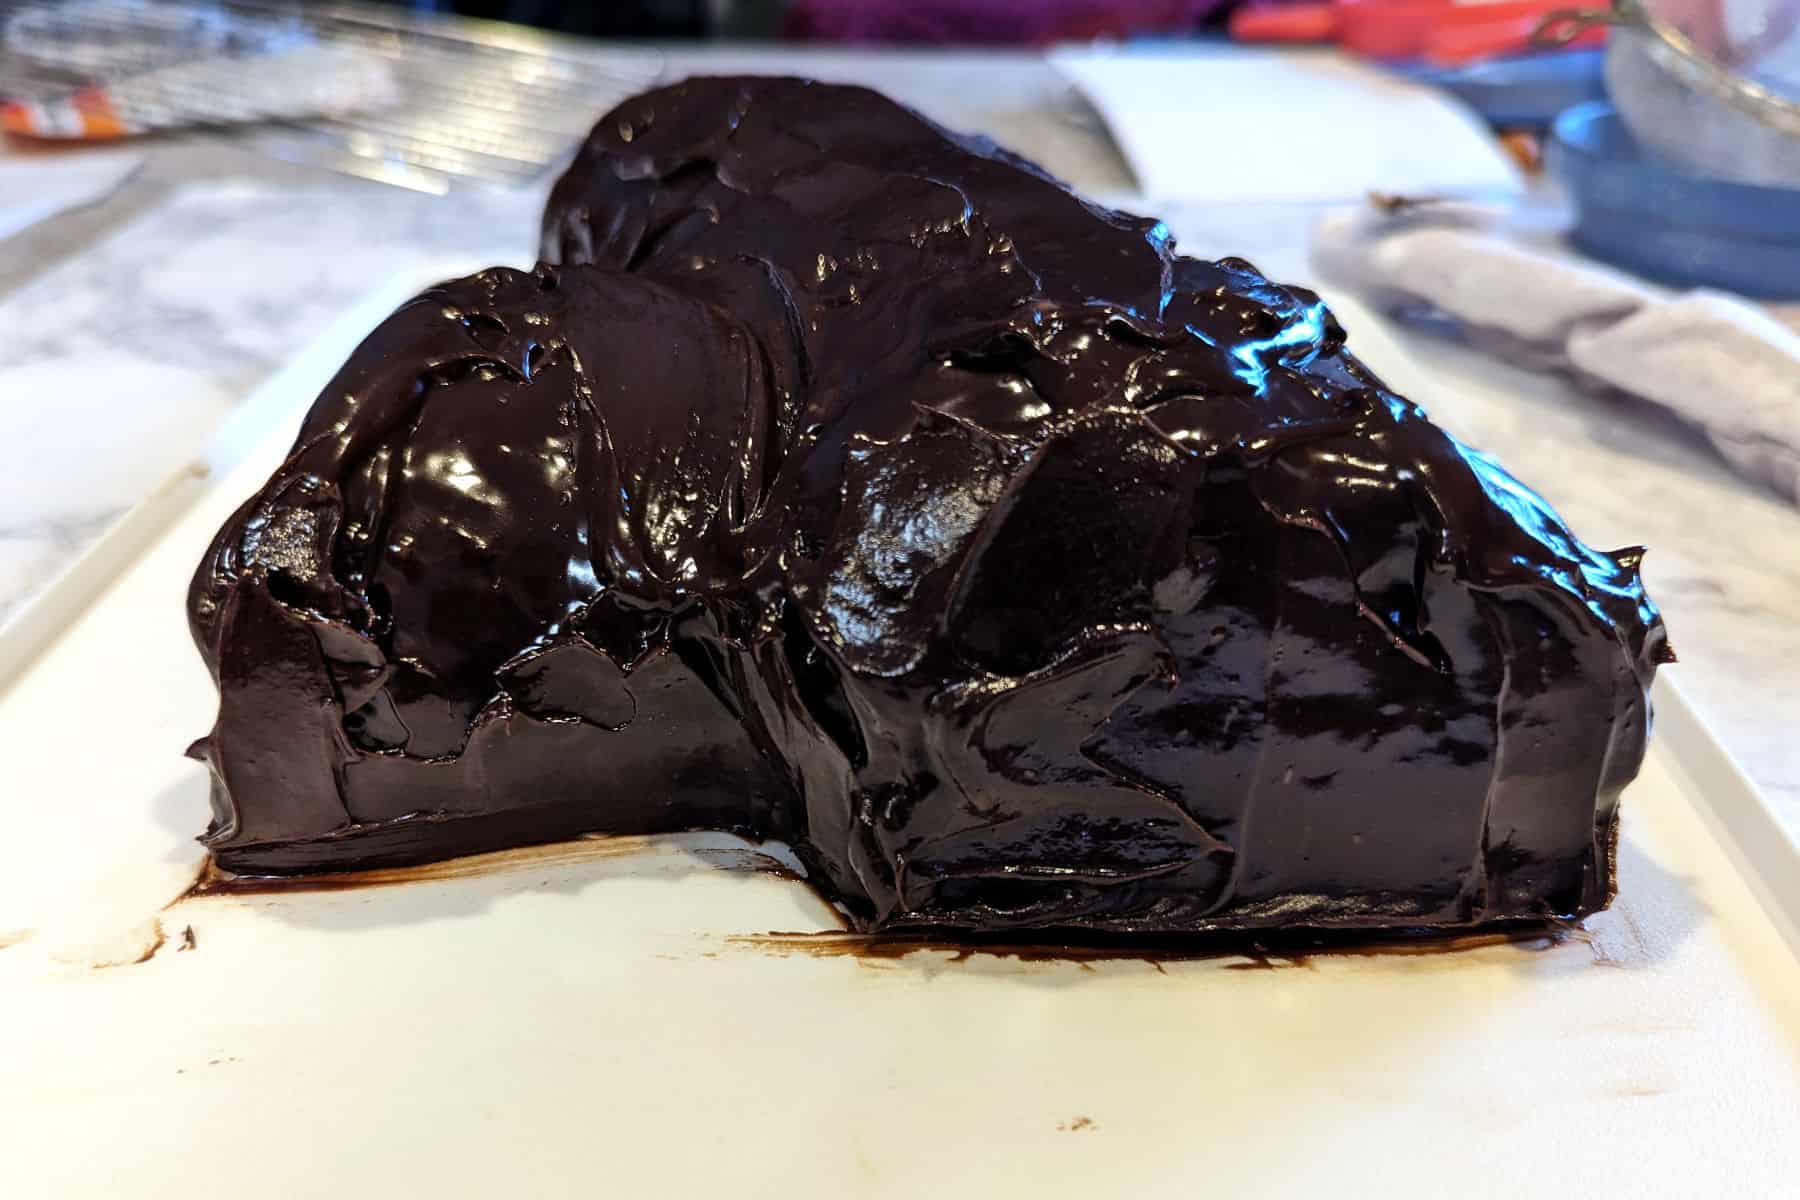
- As the ganache cools, you can also swoop the drips pooling on the platter upward to meet the rest of the ganache.
Once you're happy with the coverage, use a rubber spatula and/or a damp paper towel to wipe the excess chocolate ganache from the platter.
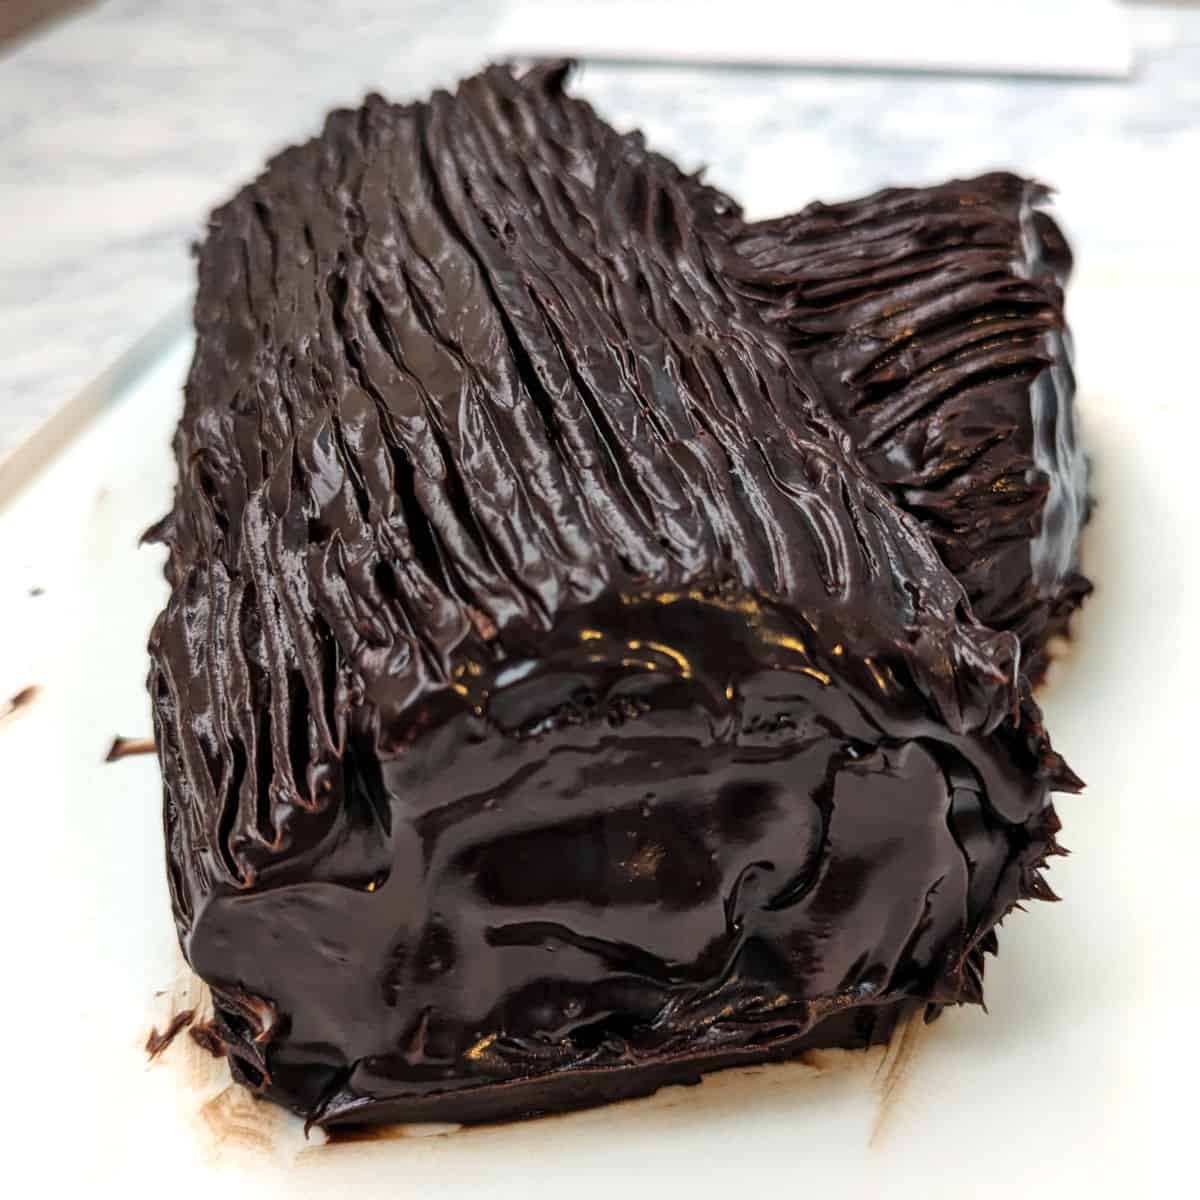
- Drag the tines of a fork gently along the yule log to make the ganache look like bark. Remember, imperfections look natural! I usually leave the cut ends alone.
Serving and Storage
Chill the cake in a covered, airtight container until you're ready to serve, up to one day in advance.
When it's time to serve, pull the cake out from the refrigerator. Use a sieve to dust powdered sugar all over the yule log to make it look like snow. Don't forget to cover the platter too; it'll hide any remaining chocolate smudges.
I've used both butter knives and steak knives to cut the cake. The key is to use a sawing motion and very gentle pressure to cut slices. Do not push! Pushing into the cake with the knife may squash the whipped cream and cake.
Leftovers are still tasty for several days, although whipped cream deflates after a little while, and the cake won't stay as pretty. The powdered sugar absorbs moisture, leaving behind tiny drops of dew on the yule log, instead of a dusting of snow.
Flavor Variations
Here's some ways you can change up the filling and ganache:
- Try a buttercream frosting in place of the whipped cream, for a firmer, sweeter roll.
- Replace the whipped cream with whipped ganache for an all-chocolate yule log.
- Add ¼ teaspoon peppermint extract to the ganache.
- See below for a coconut version!
Make It Dairy-Free
Since this is a naturally gluten-free recipe, I wanted to see if we could accommodate dairy allergies for friends. I turned to coconut oil and coconut cream for this, turning it into a chocolate coconut yule log.
Coconut Cream Whipped Cream
As one filling option, I made whipped cream from a can of coconut cream, following the vegan whipped cream recipe from Loving It Vegan. Fat content affects how well the cream whips, so I used a can of Target-brand coconut cream (not milk), which has more fat. Refrigerated coconut milk beverages will not work.
You'll need to plan ahead, at least 12 hours, to make coconut-based whipped cream. It takes longer to whip than dairy heavy cream and will reach a softly whipped cream consistency at best. Coconut cream and milk taste very coconutty and not at all sweet, so definitely add powdered sugar and vanilla.
Coconut whipped cream smushes much more easily than whipped cream when you cut the yule log, but its texture was fluffier and softer than the buttercream below. My local dairy-free testers preferred the coconut whipped cream since its texture was lighter than the buttercream, and the cake was less sweet.
Dairy-Free American Buttercream
Let me preface by saying I don't like powdered sugar (or American) buttercream, which is what most frosting in the United States is. It's generally too sweet for me, and I usually don't have the patience to make it. However, it's a good alternative to the whipped cream in this recipe. While buttercream can be made dairy-free with shortening, I don't use it so I made a dairy-free yule log with this coconut-oil based frosting from Bohemian Vegan Kitchen instead.
Coconut oil buttercream is dense (perhaps because I'm testing this in the winter); the yule log rolled reliably, and the swirls held their shape. The resulting yule log is much sweeter than my original, and the filling has a different texture than whipped cream. It's a great choice if you like sweet desserts and need to accommodate a dairy allergy. I would likely cut back on the ganache if using this buttercream again.
For me personally, I think the sweet spot would be to make a half batch of the buttercream recipe above, substituting coconut cream for the water, to make it fluffier and creamier - and then combining it with a half batch of whipped coconut cream.
Coconut Cream Ganache
To make a dairy-free ganache, you'll need 2 ingredients: a can of coconut cream or milk, and dairy-free chocolate. I used the Target-brand coconut cream as I did for whipped cream; my dairy-free chocolate was Lidl store brand dark chocolate chips. Always check the ingredients on chocolate chips, because so many contain dairy.
I melted the 1 cup of chocolate chips with ⅓ cup of coconut cream on a double boiler until it was smooth, as I do for my Chocolate Truffle Cake. This amount of coconut cream is less than the amount of dairy heavy cream I use because coconut milk is thinner, and we don't want ganache to be runny. I got this proportion from the Raspberry Buche de Noel recipe in the Superfun Times Vegan Holiday Cookbook (affiliate link), a favorite of one of my best friends.
I highly recommend making this ganache. It turned out splendidly and poured just like dairy ganache in this recipe.
Final Tip
Take your time! You're making something that looks fun, and so you should have fun with it. Even if it's imperfect, it's still chocolate cake and cream and chocolate ganache, so it will taste amazing.
Yule Log FAQ
Since the sponge is naturally dairy-free, you'll want a dairy-free filling and ganache. Margarine still contains dairy products, so I've tested both coconut-oil based buttercream and coconut cream whipped cream. Use a chocolate ganache made with canned coconut milk, with the alternate proportions I've recommended. Be sure to check the ingredients, as much chocolate includes milkfat.
Eggs provide the main structure for this this gluten-free sponge cake; there's no adequate substitute for them. To make this cake without eggs, seek out a dedicated egg-free recipe.
The gluten-free chocolate sponge cake will double in height. It should spring back if pressed on slightly, and should not sound squishy or fizzy. A toothpick inserted into the cake should come out clean. If it fails any of these tests, bake it for another minute, until it is done.
If you discover the cake isn't done when you turn it out, leave the parchment paper on it. Slip a thin large cutting board underneath the tea towel, and invert the cake back into the pan. Remove the tea towel and bake the cake for a few more minutes until it's done. Meanwhile, dust the tea towel with a fresh coating of powdered sugar; you can reuse the tea towel if it doesn't have raw batter. The finished, fully baked cake may not be as pretty as it could be, but it will still be tasty.
It depends. When I attempted this cake while visiting family in Amarillo, Texas (elevation: 3,662 feet), the cake was underbaked at 15 minutes. This could have been an issue with their oven, how much I beat the egg whites, or the altitude itself. In contrast, I never have trouble baking this at sea level in New Jersey.
If you live at high altitude, be prepared to adjust the baking. The underbaked cake sounded very fizzy and squishy when I pressed on it, rather than springing back lightly. Keep an eye on texture and doneness, and don't be afraid to bake for an extra minute or two.
You can make and assemble the yule log up to one day in advance. After that, the whipped cream may begin to deflate; however, leftovers are still tasty. I've never frozen the yule log.
Sponge cakes can crack if the egg whites are overwhipped, if there's too much gluten development in the batter, if the cake is overbaked, or if the cake wasn't rolled immediately after baking. Even after several years, I've never had a problem with cracking since I use a flourless chocolate sponge for this yule log.
Yes, Bûche de Noël is the French term for a yule log. I prefer mine to be made of chocolate to resemble a tree branch.
More Holiday Treats
Looking for other holiday goodies? Try some of my other favorite recipes:


Other Chocolate Recipes
Check out some of my other favorite chocolate recipes:


I hope this becomes a recipe you'll return to. If you try it, a star rating below helps others find it - and I'd love to hear how yours turns out in the comments! 💕 Questions or trouble? Drop a note, and I'll do my best to help.
📖 Recipe

Chocolate Yule Log
Equipment
- 2 large bowls
- electric hand mixer (affiliate link) or stand mixer
- parchment paper
- tea towel
- sieve
Ingredients
Gluten-Free Chocolate Sponge
- 6 large eggs separated
- ¾ cup granulated sugar 150 grams; divided
- ⅓ cup unsweetened cocoa powder 27 grams
- 1 teaspoon vanilla extract 5 grams
- 1 pinch table salt
Chocolate Ganache
- ¾ cup heavy cream 170 grams/6 ounces
- 1 cup semisweet chocolate 170 grams/6 ounces
Whipped Cream
- 1 ¼ cup heavy cream 283 grams/10 ounces
- ¼ cup powdered sugar 25 grams/1 ounce
For Assembly
- powdered sugar for dusting
Instructions
Gluten-Free Chocolate Sponge
- Prepare a 15x10x1 inch jelly roll pan (affiliate link). Line it with parchment paper going up the sides of the pan. (I use binder clips to keep mine in place.) Spray the parchment liberally with cooking spray. Set aside.
- Place egg yolks in a medium or large mixing bowl, and egg whites in a large mixing bowl.
- Use an electric hand mixer (affiliate link) on high speed to beat the egg whites until soft peaks form. Beat in 2 tablespoons of sugar, then beat in another 2 tablespoons, for a total of ¼ cup.
- Beat the egg whites at high speed until stiff peaks form, and the whites are glossy. When the egg whites are stiffly beaten, they will maintain their shape. You may see to the bottom of the bowl when you remove the beaters. This process may take up to 5 minutes.Scrape the remaining beaten whites from the beaters and set the bowl aside.
- Using the same beaters (no need to clean), beat the egg yolks at high speed briefly to mix. Add the remaining ½ cup of sugar, 2 tablespoons at a time (for a total of 4 additions), and then beat on high until very thick. This can take up to 5 minutes. The yellowish egg yolks will have lightened in color; if you drip beaten yolks from the mixer onto the rest, the drips will maintain their shape for a few seconds before melting into the rest of the mixture.
- Stir in the cocoa powder, vanilla, and salt on low speed, until smooth.
- Use a rubber spatula to mix a small amount of egg whites into the cocoa mixture to lighten it. Then, fold the cocoa mixture into the egg whites in two additions. Once mixed, smooth out any lumps with the back of the spatula, to break up any remaining clumps of egg whites.To fold, sink the blade part of the spatula down through the center of the bowl, to the bottom. Turn the spatula so that it scrapes up the side of the bowl, bringing the bottom and sides of the mixture to the top. Rotate the bowl by 90 degrees, and repeat.
- Gently spread the batter into the pan, all the way to the edges. Although the cake will rise upward, it will not expand sideways.
- Bake in a 375F oven for around 15 minutes, until the surface springs back if you press on it. It should not sound very squishy or fizzy. A toothpick will also come out clean, but should be the second way you check.
- Prepare your tea towel while the cake bakes; you will need it immediately when the cake is done.
While the Cake Bakes
- Spread out a clean tea towel (free of lint) on your counter; this towel should be larger than your jelly roll pan (affiliate link). If you don't have a lint-free towel, you can use parchment paper or waxed paper in a pinch.
- Use a sieve to dust the surface of the tea towel liberally with powdered sugar.
Rolling and Cooling the Cake
- Once the cake is done, immediately invert the pan onto your prepared tea towel. Carefully peel back the paper from the cake; use a rubber spatula if necessary to scrape the cake down off of the cake in spots where it sticks.
- Once you have the paper off of the cake, tightly roll the cake up from the short end, including the tea towel in the center to keep the layers separate. The seam of the cake should be on bottom. Place on a cooling rack and cool completely (about an hour) before assembling.
Chocolate Ganache
- 30 minutes before you plan to assemble the yule log, prepare the chocolate ganache.
- Place 1 cup (6 ounces) chocolate chips or chopped chocolate in a heat-safe bowl.
- In a small saucepan over medium heat, bring the ¾ cup (6 ounces) heavy cream just to a boil. Swirl the pan a few times to be sure it heats evenly. Don't boil, or it will overflow. Remove from heat.
- Immediately pour half of the heated cream onto the chocolate. Let it rest for 30 seconds to soften. Stir in small circles or spirals, starting at the center of the bowl, spiraling out toward the edge.
- Stir in that way until the chocolate and cream are combined, and then add the remaining hot cream. Let it rest again for 30 seconds, and repeat the process of stirring/spiraling out from the center to the outsides of the bowl. Stir only as much as necessary.
- Set the ganache aside to let it cool and thicken for the remaining 20 minutes while the cake cools. It will be too thick after that and will need to be reheated.
Whipped Cream
- Place 1 ¼ cups (10 ounces) heavy cream in a large mixing bowl. (Be prepared; cream splatters everywhere!) Add the ¼ cup powdered sugar.
- With an electric mixer, start mixing the cream on low to get it foamy. Turn the speed up to high speed and whip the cream to stiff peaks. Stop often to check the consistency. Like with the egg whites, stiff peaks won't flop over. You'll see an obvious trail where the beaters were. When you remove the beaters from the whipped cream, there will be a hole or gap where they were.
Assembling the Yule Log
- Place the chocolate roll on your work surface and unroll it.
- Dollop the whipped cream along the surface of the cake. Spread it out into the short edge where you started the roll (which will become the center). Leave a ½ inch gap along the long sides of the roll, and a 1 inch gap along the other short end. The cream will spread into those gaps as you roll the cake.
- Roll the cake back up. (But don't include the tea towel in it this time!) Roll it relatively tightly. Some cream will squish out of the sides and end of the cake roll; this is normal and okay. The seam of the cake should be on bottom again.
- Using a serrated knife and gentle pressure, saw off a small section of the cake off on a diagonal. Use a spatula to transfer the main log to a serving platter, and position the smaller branch alongside it as if it's growing from the main log. Take your time to consider the branch from all angles, and reposition it if you'd like.
- Use a spoon to drizzle the chocolate ganache along the top of the cake. It will slowly drape along the sides. Add more where the ganache ends, until the sides are coated. I use a spoon and go slowly because it gives me more control of where the chocolate flows. If the ganache is too warm or you pour too much at once, it all drains onto the serving platter, and you have to scoop it up later.
- Decide if you want to cover the swirled ends of the cake, or if you want to leave the whipped cream showing. If leaving the whipped cream exposed, cut small, neat slices to even up the ends.
- If covering the whipped cream, swipe up any excess that peeks beyond the edges of the sponge cake before coating it; this makes it much easier to coat. Drizzle the chocolate over the ends the same way that you did with the sides of the cake.
- Take a look around the cake from all angles, seeing if you need to do any chocolate touch-ups. Fix it as needed. By this time, chocolate ganache is usually cool enough that I can swipe it up from the platter onto the cake, and it will stay.
- Use a clean rubber spatula, or a dampened paper towel, to scrape excess chocolate ganache from the serving platter to pretty it up.
- Drag the tines of a fork gently along the log to make the chocolate look like ridges of bark. They don't have to be perfectly straight; tree bark never is. Don't forget to do the short branch as well. I prefer to leave the ends as they are.
- Refrigerate the cake in an airtight container until ready to serve.
Serving and Storage
- Remove the cake from the refrigerator. Use a sieve to dust the entire cake, and the serving platter, with powdered sugar to look like a dusting of snow (and cover up any imperfections in the chocolate).
- Both butter knives and steak knives work to cut the cake. Saw back and forth along it gently, with minimal pressure, until you cut through the cake. Don't press, which will squish the cake and mess up the spiral.
- Store remaining cake in a sealed container in the refrigerator. The powdered sugar will absorb moisture and resemble dew instead of snow. Whipped cream will deflate slightly, but the cake will still taste good after several days.
Notes
Nutrition
[Originally published December 22, 2023. Restructured and clarified December 9, 2025; added dairy-free testing. Recipe has largely remained the same.]


Leona Konkel says
This is still my go-to creamy dessert. I can't resist whipped cream, chocolate ganache, and tender chocolate cake. I love that I use a flourless chocolate sponge because it also makes it slightly lighter in calories. I hope you find my walkthrough useful; it's one of the few elaborate desserts I make, and I love it.